Connecting
to consoles
To use LIVE mode,
you need to insert and connect to a control console or compatible offline
editor. If you use a DMX console, you require a DMX interface device to
connect to WYSIWYG.
You must ensure that the patch you have
created in WYSIWYG and the patch in your console are exactly the same
for simulation to work properly.
To
connect to a console
- Connect the console to the computer with the appropriate
hardware.
- From the menu,
choose .
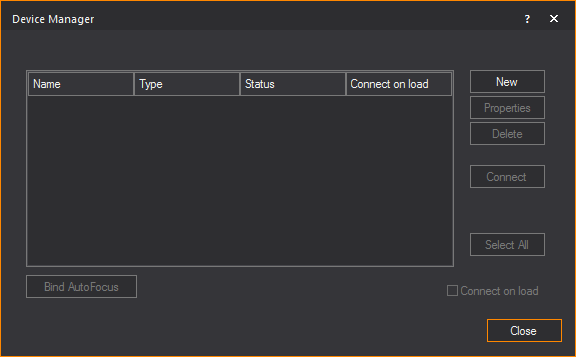
Result: The
Device Manager window appears.

- Click New.
Result: The
console library is displayed.
- Navigate through the console library until you
find the console or device that you are connecting to. Click the console
name to highlight it.
- Click Insert.
Result: The
console appears in the Device Manager.
- With the console name still selected, click Properties.
Result: The
Properties dialog box appears.
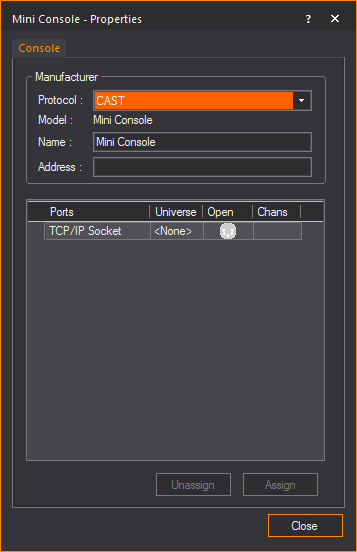
- From the Protocol drop-down
list, select the protocol used by the console. For example, DMX, SandNet.
Result: The
console model is displayed in the Model box.
The name of the console is displayed in the Name box.
- In the Address box,
type the designated address of the console, if applicable.
- A list of the output ports from the console appears
in the Ports list. You must assign
these outputs to WYSIWYG patch universes. Click the appropriate port
to highlight it.
Notes:
- Motion control systems have a single port named
“Motion.”
- If
you are working with a motion control system, then you can assign
only to motion universes; if you are working with a DMX console then
you can assign only to DMX universes.
- Select the desired Patch Universe, and then click
OK.
- Repeat the above steps to bind all ports to their
appropriate patch universes.
Note: You
cannot control a channel count exceeding that of the WYSIWYG Perform package
that you purchased.
- Click Close to
close the Properties box.
- Click Connect.
Result: The
status of the console changes to “connected.”
- Click OK to
exit the Device Manager.
Notes:
- Once the console is running and connected to
the WYSIWYG drawing, operate the console as you would in the live
venue. Run up channels and record cues using the console. Remember
that WYSIWYG does not store or save cues—this is done in your console’s
memory. Once the console information is set up, you can set WYSIWYG
to automatically connect to the console every time the file is opened.
- You can also perform the above procedure through
the Device Manager Toolbar. For details,
see Device
Manager Toolbar.
To unassign the patch binding settings of multiple ports
- From the menu,
choose .
Result: The
Device Manager dialog box appears.
- Select the console.
- Click Properties.
- Select the ports for which you want to change
the patch binding.
- Click Unassign.
Result: All
the selected ports will become unassigned.
To patch multiple
ports simultaneously
Note: When
assigning multiple ports to universes, the selected ports will be assigned
to universes in sequential order. The universe sequence is based on availability,
then alphabetical order.
- From the menu,
choose .
Result: The
Device Manager dialog box appears.
- Select the console.
- Click Properties.
- Select the ports for which you want to patch.
- Click Assign.
Result: The
Quick Patch Assignment dialog box appears.
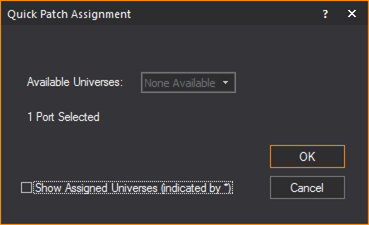
- To have all universes available for patching,
even ones that were previously assigned, select the checkbox by Show Assigned universes (Indicated by *).
Otherwise, only unassigned universe will be available to patch.
- In the Quick Patch Assignment window,
from the Available Universes drop-down
list, select the universe that will be assigned to the first selected
port.
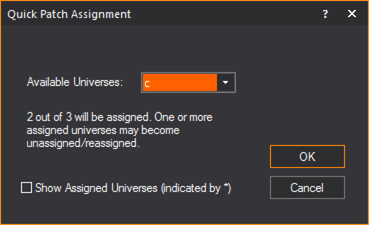
Result: A
summary of the assignments are displayed in the dialog box. The summary
notifies if there is a conflict with either a universe being unassigned
or reassigned.
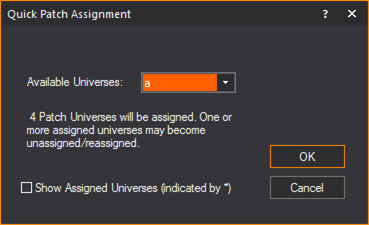
- Click OK.
Result: The
ports will be patched to universes. The first port selected will be assigned
to the first universe selected. The next sequential port will be patched
to the next sequential universe. This continues until all the selected
ports are assigned, or there are no more available universes to assign.
- Click Close to
close the Properties box.
- Click Connect.
Result: The
status of the console changes to “connected.”
- Click OK to
exit the Device Manager.
To connect the
Image Console
The Image Console
is produced by CAST Software and ships with WYSIWYG. It acts like a lighting
console, media, or video server, enabling you to control color, intensity,
and the image display of all patched LED surfaces that you have created
with the LED Wizard.
- From the menu,
choose .
Result: The
Device Manager window appears.
- Click New.
Result: The
console library is displayed.
- Double-click >
> , and then highlight .
- Click Insert.
Result: The
console appears in the Device Manager.
- With the console name still selected, click Properties.
Result: The
Properties dialog box appears.
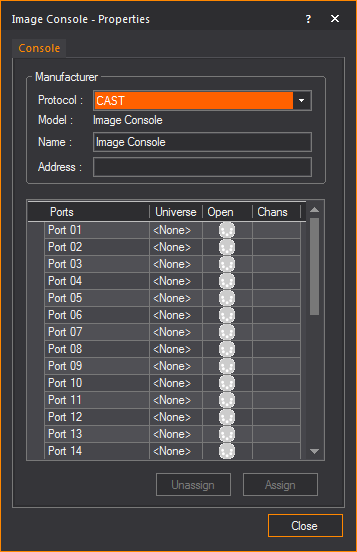
- Leave the defaults for Protocol,
Model, and Name.
- In the Address box,
type the designated address of the console. Note that this address
must match the Device Address that
you type in the Image Console window.
For details on configuring the Image Console,
see To
configure the Image Console.
- A list of the output ports from the console appears
in the Ports list. You must assign
these outputs to WYSIWYG patch universes. Double-click the appropriate
port to open the Quick Patch Assignment window.
- In the Quick Patch Assignment window,
select the appropriate patch universe, and then click OK.
- Repeat the above steps to bind all required ports
for your LED grid to their appropriate patch universes.
Note: You
cannot control a channel count exceeding that of the WYSIWYG Perform package
that you purchased.
- Click Close to
close the Properties box.
- Click Connect.
Result: The
status of the console changes to “connected.”
- Click OK to
exit the Device Manager. You can now
control the patched LED grid with the connected Image
Console. For details, see To
control a patched grid of LEDs with the Image Console.
Device
Manager Toolbar

The Device Manager
Toolbar simplifies your regular device connect/disconnect operations.
You can use the drop-down list on this toolbar to select a device (Consoles,
Devices, Networks), and then click the connect icon or the disconnect
icon.
The “All Devices”
option in the drop-down list enables you to easily connect/disconnect
all devices with one click without opening the Device
Manager.