Rendering
Rendering
lighting looks
In
WYSIWYG, you can render lighting looks to produce high quality images
of your set and lighting. Rendering uses a full range of effects,
including depth of field, motion blur, soft shadows, and antialiasing
settings to produce a photorealistic image.
Based on the product level that you are
running, when you are creating a rendering, you have two choices:
- Render Wizard:
(all product levels except Report) You can use the interactive editing
and advanced visual effects of the Render Wizard to set up the look
that you want to render, and then create the rendering. In this case,
you must leave WYSIWYG running while the Render Wizard finishes the
image. You have the choice of saving the image to an external folder
that you specify or within WYSIWYG on the Images
tab.
- Background Rendering Manager:
(all product levels except Report and Perform - Console Edition) You
can use the Render Wizard to set up the look that you want to render,
and then send the render job to the Background
Rendering Manager to create the rendering.
This feature lets you use the Windows taskbar
to queue render jobs that will execute in the background without requiring
WYSIWYG to run, letting you do other tasks while the Render Engine works
independently. You can also pause and resume renderings without losing
your render, and shut down/restart your computer without losing your rendering
progress. For details on this feature, see Background
Rendering Manager.
To render a lighting
look
- In the working area of the screen, display the
lighting look that you want to render.
- From the menu,
choose .
Tip: You can
also click the Render Wizard icon
in the Design toolbar.
Result: The
Render Wizard appears and guides you through
a series of options.
Step 1 - Set
Output Destination and Image Size
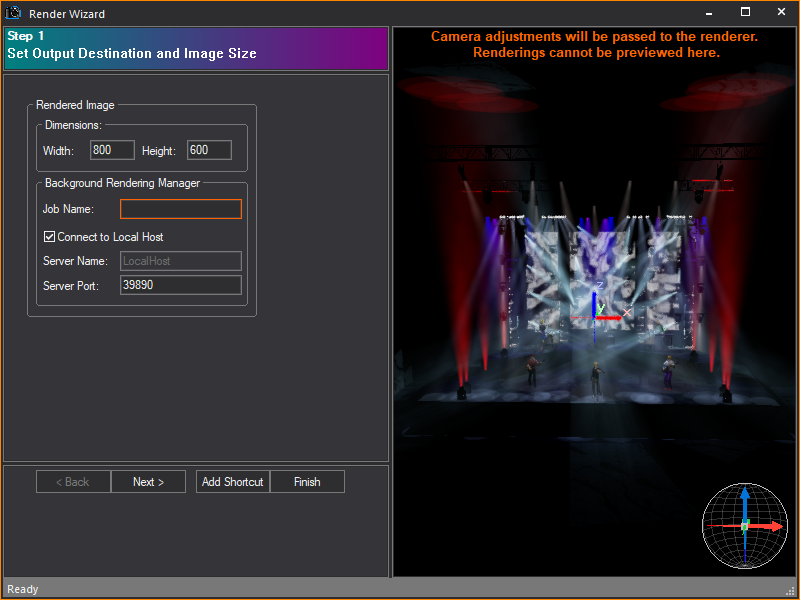
Click in the right pane to arrange the
image that you want to render. You can click and drag the image around,
zoom in and out with the mouse wheel (or PAGE
UP / PAGE DOWN keys), or set
up your shot accurately using a camera.
Note:
- Make sure you use the appropriate aspect ratio
(height vs. width) for the output device that you will be using
to present the pictures. For example, TV is 4x3 (normally 640x480),
HDTV is 16x9.
- If this is the first time you are using the
Background Rendering Manager, you
must configure it before the rendering process will begin. Upon
clicking Finish in the Render Wizard, the Background
Rendering Manager Configuration Wizard appears, enabling
you to configure settings such as the Network Port, the default
folder for storing rendering files, and other Manager settings.
For details, see To
configure the Background Rendering Manager.
- Dimensions: Type
a value in pixels for the width and height of the final image.
- Job Name: Type
a name for the rendering job.
- Connect to Local Host:
Select this checkbox to use the default values and have the Render Wizard send all jobs to the Background Rendering Manager that is
running on your computer. To send render jobs to another computer
in your network that is running the Background
Rendering Manager, clear this checkbox and then type the server
name and port number in the boxes provided. Note that when you send
render jobs to a network computer, the Background
Rendering Manager must be open and running on this destination
computer; in this case, the act of sending a job from the Render
Wizard does not launch the Background
Rendering Manager.
- Server Name: Type
the name of the server in your network that is running the Background
Rendering Manager where you want the Render
Wizard to send all render jobs. The server must be running
WYSIWYG Release 18 (or higher) and have a dongle attached.
- Server Port: Type
the port number that the WYSIWYG Render Wizard will
use to send render jobs to the Background
Rendering Manager, or accept the default port number shown.
It must be a value between 1025 and 65,535. For proper communication,
this number must match the port number that is configured in the Background Rendering Manager on the
destination computer; therefore, if you change this value, you must
also change it in the Background Rendering
Manager on the destination computer. For details, see
To
configure the Background Rendering Manager.
Note: By
default, the Background Rendering Manager runs
on the same system as WYSIWYG. You can also run it on a separate machine.
For more information, see Background
Rendering Manager.
Step
2 - Set Camera and Simulation Type

Options in Step 2 affect the composition
of your image.
- Scene: Select
a scene for the rendering. Scenes are groupings of layers used to
organize a plot. For more information on scenes, see Scenes.
- Follow Current Scene:
Select this checkbox to use the scene that is displayed in the Scene drop-down list. Clear the checkbox,
and then select the desired scene from the Scene drop-down
list.
- Camera: Select
the camera for the rendering. Cameras are set up in CAD mode. For
more information on cameras, see Drawing
cameras.
- Aperture size:
Use the slider to adjust the camera aperture. This adjustment changes
the depth of field of the final image. The larger the aperture, the
“fuzzier” the rendering. The focus point is always the target of the
camera.
Note: By default, the red lines
indicating the Camera Target are
visible. This is to aid in the composition of the image. It will not,
however, be visible in your final rendering. To turn the target off (that
is, set to not visible), right-click in the preview pane, and then choose
View Options. For more information on Shaded
view, see Modifying
shaded views.
- Ambient Light:
Use the slider or type a value in the box to set the ambient light
level. This adjusts the overall light level, where 0% is complete
black and 100% is a bright room. This does not affect the intensity
of the fixtures in your lighting look.
- Pan tool moves objects:
The Pan tool does not affect the outcome of your rendering. Rather
the tool rotates the model on the target (if checked) or rotates the
camera around the target (if unchecked). Both settings help you to
compose your image.
Step 3
- Add Atmospheric Effects to Your Rendering
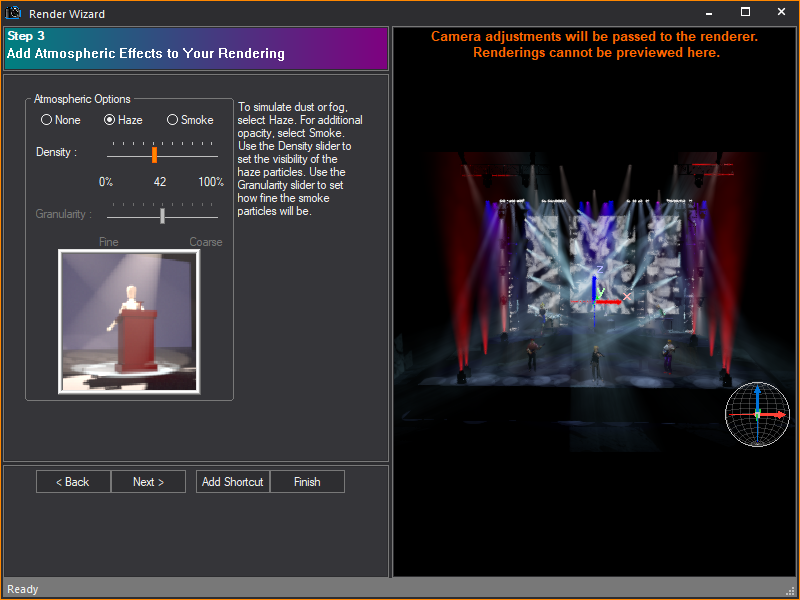
Options in Step 3 affect the atmospheric
conditions in your rendering.
- Atmospheric Options:
The options that you set here affect the atmospheric conditions that
are visible in your final rendering. To simulate atmospheric dust
or fog, select Haze. For additional
opacity, select Smoke.
- Density: Use the
slider to set the visibility of the haze particles. A setting of 0%
indicates that the particles cannot be seen.
- Granularity: Use
the slider to set the granularity of the smoke. This setting affects
how fine smoke particles are. This option is available only if you
choose Smoke under Atmospheric Options.
Step
4 - Select How Shadows Will Be Simulated

Options in Step 4 affect the projection
of shadows in your rendering.
- Shadows: Select
how you want shadows to be projected in the final rendering. If you
choose None, then no shadows are calculated
by WYSIWYG; that is, objects in the path of the light beam do not
create shadows. Instead, all objects in the path of the virtual beam
are illuminated, even if an object would normally block the beam from
reaching another. As illustrated in the rendering below, all three
surfaces are illuminated and the beam continues into infinity.

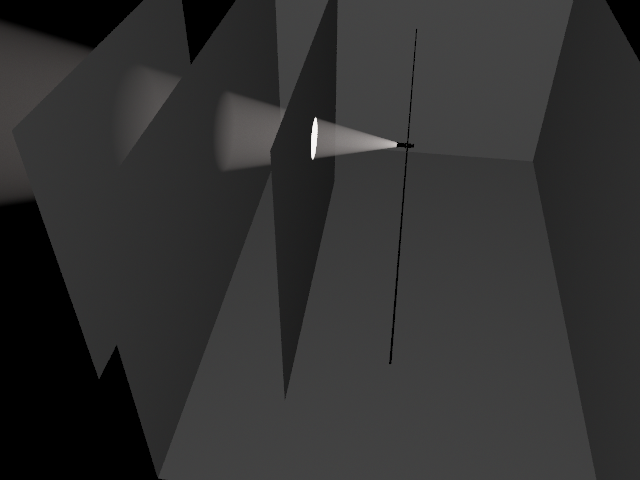
To calculate which objects the beam of
light will hit and which objects it will not hit, select Objects.
Objects in the path of the virtual beam will not be illuminated by the
beam if the beam has already been blocked by another object. However,
WYSIWYG still does not calculate where the beam stops. As illustrated
in the rendering below, the first surface is illuminated, but the beam
is still continuing into infinity.
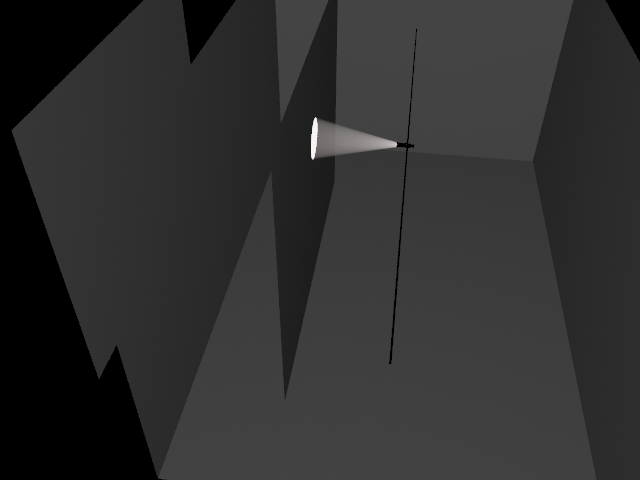
Select Atmospheric
to calculate which objects the beam of light will hit and where
the beam of light will end. This is a true representation of how light
behaves. As illustrated in the rendering below, the first surface is illuminated
and the beam also stops there.
- Beam
Saturation: Use the Beam Saturation slider
to change the relative brightness of fixture beams. When set to Realistic, WYSIWYG accounts for all variations
in lamp output, including gel transmission, color temperature, fixture
efficiency, and lamp. When set to Standard,
all fixture beams are rendered at the same general intensity.
Step
5 - Define How Light Reflection Will Be Simulated

Options in Step 5 affect the radiosity
level. Radiosity is defined as the combined processes of emission, transmission,
and absorption of rays or reflecting beams of light. When using Radiosity, it is not necessary to use ambient
lighting.
- Radiosity: To
generate a rendering that uses radiosity, select the Radiosity checkbox,
and then choose from the available radiosity options. Fast radiosity
results in a rendering with constant, flat lighting. Each subsequent
option shows more calculated lighting. The number of bounces determines
how many levels of reflection are permitted.
- Disable Ambient Light:
Select the Disable Ambient Light checkbox
to ignore the ambient light settings from Step 1.
- Render as Screen:
Select the Render as Screen checkbox
to display the LED wall as a screen with a projected image instead
of a detailed grid of LED pixels forming the image. Render
as Screen is only available if the source of your LED
wall is color, image or video. Render as Screen does
not work if the source of the LED wall is Dynamic DMX patch.
Step
6 - Add Environmental or Outdoor Lighting to Your Rendering

Options in Step 6 affect the presence and
quality of environmental or outdoor lighting. Note that for environmental
lighting to have an effect, your show must not be contained within a venue.
- Enable Environmental
Lighting: To generate a rendering that considers outdoor lighting
conditions, select the Enable Environmental
Lighting checkbox.
- Date and
Time: The date and time of the rendering
determines the position of the sun and/or moon and the resulting amount
of light available. The position of the sun is also determined by
the geographic settings that are configured in Document
Options and the north direction that is set in CAD mode.
For more information on regional settings, see Regional
Settings tab. For more information on setting the direction
that is north, see Drawing
a compass.
- Sky Conditions:
The amount of light available determines the brightness of the resulting
rendering. Use the Sky Conditions slider
to adjust the quality of light.
- Soft
Shadow: Select the Enable soft shadow checkbox,
and then use the slider to set the softness of shadows that are created
by sunlight. The softer the shadow, the less sharp the resulting shadow.
Step 7 - Use Anti-Aliasing to
Smooth or Sharpen Rough Edges
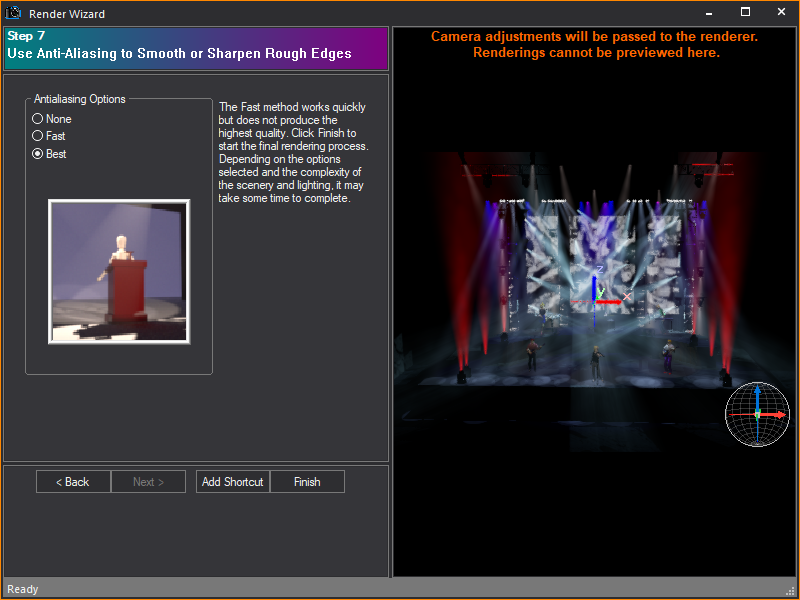
Options in Step 7 affect the antialiasing
settings. Antialiasing is a method of smoothing out and sharpening rough
or jagged edges of images to produce a more polished result. This method
subsamples the pixel area and averages the results of neighboring samples
to reduce the areas of high contrast (edges).
- Antialiasing Options:
Choose how you want edges to appear in your final rendering. The Fast method samples the pixels quickly,
but does not produce the highest quality.
- Click Finish to
start rendering. The total rendering time depends on the options that
you selected and the complexity of the scenery and lighting. Based
on the location where you chose to save the completed rendering in
Step 1, your options vary upon clicking Finish:
WYSIWYG sends the render job to the Background Rendering Manager, then a status
window appears, showing the progress as the render job is sent to the
Background Rendering Manager on the
destination computer (either your own or another server in the network).
When the job has been sent successfully,
you can open the Background Rendering Manager to
check its progress. You can close the Render Wizard and
WYSIWYG, queue jobs, pause and resume them, and shut down/restart your
computer without losing the rendering progress. For details, see To
use the Background Rendering Manager.
Note: If this
is the first time you are using the Background
Rendering Manager, you must first configure it before the rendering
process will begin. Upon clicking Finish in
the Render Wizard, the Configuration Wizard appears, enabling you to configure
settings such as the Network Port, the default folder for storing rendering
files, and other Manager settings. For details, see To
configure the Background Rendering Manager.
Saving
render settings
You can save the options that you set in
the Render Wizard as a shortcut for quick access to these settings at
a future time. There are two ways of saving a Render shortcut:
- From the Render Wizard.
- From the Render
shortcut bar, in a similar manner as other shortcuts.
The Render shortcut
bar is prepopulated with two shortcuts: Quick
Render and Full Render. Quick Render shortcuts provide settings for
a small, lower-quality render, while Full Render shortcuts
provide settings for a larger, high-quality rendering.
To create a shortcut from the Render Wizard
- From the menu,
choose .
- While working through the steps in the Render
Wizard, you can, at any time, click Add
Shortcut to save the current settings as a shortcut.
- Type a name for the shortcut.
- Click OK.
Result: The
shortcut is added to the Render shortcut
bar.
To create a shortcut from the Render shortcut bar
- Right-click in the open space on the Render
shortcut bar, and then choose .
- Type a name for the new render.
- Click OK.
Result: The
Render shortcut is saved on the Render shortcut
bar. The shortcut is preconfigured with the default values for each of
the eight steps. These defaults are the same values that are used when
you choose from the Menu bar
or the toolbar.
To modify a Render shortcut
- Double-click on the Render shortcut that you want
to modify.
Result: The
Render Wizard appears, with the values
that are saved in the shortcut.
- Modify the options as required.
Result: The
settings are recorded in the shortcut and are available the next time
that you select the shortcut.