Merging an MVR file into the open WYSIWYG document follows the MVR Merging Rules. During a merge, incoming data from the incoming MVR file takes precedence and replaces the existing data in the open WYSIWYG document.
You can merge an MVR file the same as you would merge any other file. The two MVR Merge options available in WYSIWYG are Merge New and Update Existing and Update Existing Assets Only. These Merge Type options are only enabled when merging an MVR file, and disabled when importing an MVR file.
When you merge an MVR file, the latest incoming data from the MVR file always takes precedence over existing data contained in the open WYSIWYG document, even if you have modified existing data since the last import. Updates from the latest MVR file will always take precedence over any changes made since the last import or merge.
Example:
Result: In the WYSIWYG document, the Fixture's patch is updated to the latest change per step d and the Layer is renamed "Conventionals" per step d. Updates from the latest MVR file 'version 2' takes precedence over any changes made since the last import or merge.
Select this option when the current WYG file came to be as a result of importing/merging a previous version of the MVR file that's now being merged. When this option is selected, no new Layers or Assets from the MVR file being merged will be considered for import except as described below; if any previously-imported/merged Layers and/or Assets have received updates since the previous import/merge, they will be updated with the incoming data.
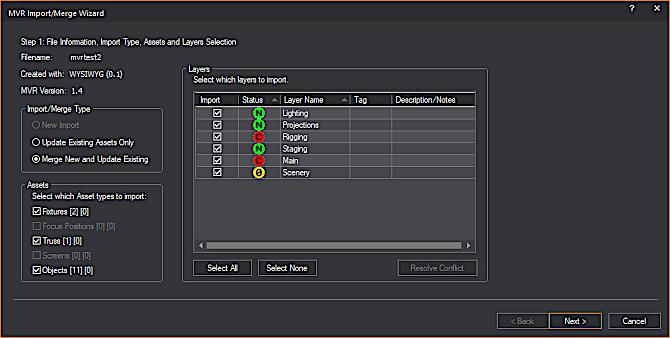
In the Assets section, the numbers that follow the Asset types indicate how many Assets of each type will be updated. In the Layers section, only new Layers which must import will appear in the table. (These Layers cannot be unchecked.)
The incoming MVR file may contain NEW Assets or Layers that will be forced to merge into the current file. These may include one or more of the following:
For more information on resolving name conflicts, see the following To_merge_an_mvr_file section.
As with Update Existing Assets Only, select this option when the current WYG file came to be as a result of importing/merging a previous version of the MVR file that's now being merged. When you select this option, existing Layers and Assets will be updated exactly as when the Update Existing Assets Only was selected and new Layers and/or Assets which did not exist during the previous import/merge may be merged as needed. (Some Layers and Assets must merge, if required.)
In the Assets section, Asset types appear with two numbers within brackets. The first number next to the Asset type indicates the count for new incoming assets and the second number indicates the count for existing assets. (e.g., Fixtures [x] [y], where x is the new incoming assets count and y is the existing assets count.) An enabled Asset checkbox (meaning it can be clicked to check or uncheck) indicates that NEW Assets of that type exist in the incoming file, and you may choose whether or not to merge them. However, this choice only applies to those NEW Assets; existing Assets which have been updated in the merging MVR file will update without your input, once the merge is complete.
In the Layers section, the table will display Layers which contain new Assets, which you may choose to merge or not. Should a new Layer's name match the name of a Layer that already exists in the current file, you will have to resolve this conflict in order for the merge to proceed. Alternatively, you may uncheck that Layer's import checkbox to leave it out of the merge; doing so, however, will result in any new Assets belonging to that Layer not to merge either. For more information on the Layer conflict status, see the following To_merge_an_mvr_file section.
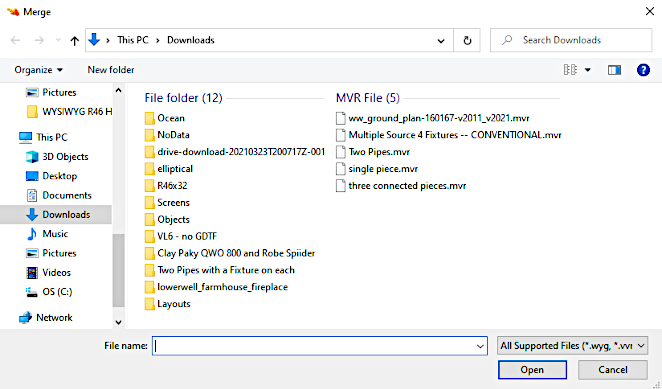
This procedure inserts the imported MVR file into an open WYSIWYG document.
Result: The Merge browser window appears.
Note: The file you select should be an updated version of the .MVR file that you initially imported into this document, or an updated version of the .MVR file that you last-exported from this document.
Result: The MVR Import/Merge Wizard appears.
Note: For more information on the MVR Import/Merge Wizard, see the Importing_MVR section.
When you are merging, the Status icons that could appear on each Layer row are:
 :
The "Empty" icon indicates that the Layer does not contain
Assets selected for import or contains no Assets at all.
:
The "Empty" icon indicates that the Layer does not contain
Assets selected for import or contains no Assets at all. :
The "New Layer" icon indicates that this Layer will be added
to the resulting WYSIWYG document.
:
The "New Layer" icon indicates that this Layer will be added
to the resulting WYSIWYG document. :
The "Conflict" icon indicates that the Layer name matches
an existing Layer name. Conflicts must be resolved in order for merge
to proceed.
:
The "Conflict" icon indicates that the Layer name matches
an existing Layer name. Conflicts must be resolved in order for merge
to proceed.Note: If you do not click this button, you will be prompted to resolve all conflicts before proceeding to Step 2 of the MVR Import/Merge Wizard.
Result: The Step 2: Fixture Mapping window appears.
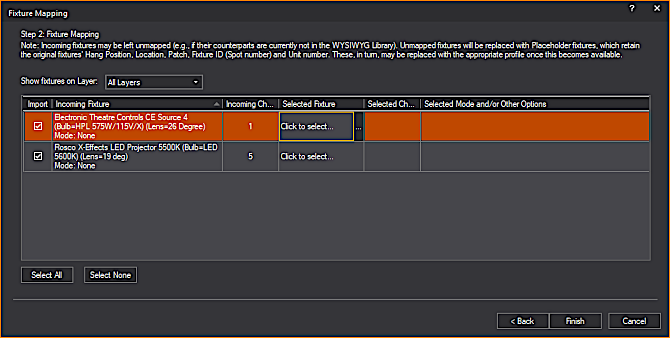
Note: For more information on Fixture Mapping, see the Importing_MVR section.
Note: On occasion, depending on the contents of the MVR file being merged, it is possible for Fixtures which were already mapped during the previous import/merge to require re-mapping.
Result: The Import/Merge Summary window appears.
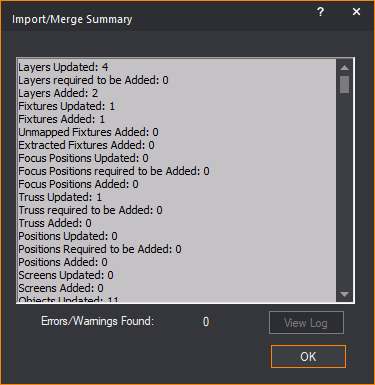
Result: Contents of the incoming MVR file are merged into the open WYSIWYG document.
![]() © CAST Group of Companies Inc., 2002-2024 All rights reserved.
© CAST Group of Companies Inc., 2002-2024 All rights reserved.