Importing
MVR
Importing MVR files into WYSIWYG requires
the conversion of MVR Nodes into equivalent WYSIWYG entities.
In WYSIWYG, from the Welcome
Screen, you can import the MVR file from the Import section
or choose to open a file from the Open section
or menu. Importing an MVR in WYSIWYG
creates a new WYSIWYG document out of the MVR file.
The MVR Import/Merge
Wizard appears after you select the MVR file from your browser
window. The MVR Import/Merge Wizard provides
information and import options for the MVR file you chose to import.
When you complete importing an MVR file
in WYSIWYG:
- Layers are converted into WYSIWYG Layers.
- Non-fixture assets convert to various object types
as outlined in the MVR-WYG Translation Table (below).
- Incoming Fixtures are replaced by their counterparts
from the WYSIWYG Library according to your definitions in the Fixture Mapping window (below).
Note: Entities
that were imported from an MVR file cannot be renamed.
Converting
MVR Nodes to WYSIWYG entities
The MVR-WYG Translation
Table describes how MVR Nodes convert to WYSIWYG. MVR Nodes
are referred to as Assets in The MVR Import/Merge Wizard.
MVR
Node |
WYSIWYG
Entity |
Notes |
| Symdef |
Library
Item |
Imports
into the MVR folder in the main folder Library > Objects Library.
|
| Position |
Position |
Appears
in the Position Manager.
|
| Layer |
Layer |
The
option to choose which Layers to import appears in Step 1 of the
MVR Import/Merge Wizard.
|
| SceneObject |
SetPiece
or
Library Item |
Objects
in MVR files are stored in the .3DS or .GLB file format, complete
with textures. If only one instance of an object exists in the
.MVR file, it imports as a Set Piece, whereas two or more import
as Library Items. In most cases, either entity type will feature
elements which can be used to easily make changes to their textures.
|
| GroupObject |
Group |
In MVR
or WYSIWYG, groups can be nested and one object can only belong
to one group.
In WYSIWYG, Fixtures
cannot be grouped. Fixtures that belong to a group in MVR will
be extracted from the group.
|
| FocusPoint |
Focus
Position |
When
FocusPoint Nodes exist in the MVR file and at least one fixture
in the MVR file is lined to a FocusPoint, Focus Position Assets
are forced to import.
|
| Fixture |
Fixture |
Incoming
Fixtures must be mapped manually to the equivalent WYSIWYG Fixture
(Library Profile). This is done in Step 2 of the MVR Import/Merge Wizard. Resulting Fixtures retain the incoming Fixtures'
attributes (layer, location in 3D space, hang postion, patch,
fixture ID, etc.).
|
| Truss |
Library
Item |
Incoming
Truss converts into a Library Item which retains the Name attribute
from the MVR file.
|
| VideoScreen |
Screen |
The
option to import Video Screens appears in Step 1 of the MVR Import/Merge Wizard. |
To import an mvr file
- On the Welcome Screen,
click My Virtual Rig in the Import section.
Tip: You can
open the MVR file from the Open section
of the Welcome Screen or choose from the
menu.
Result: The
Import browser window appears.
- In the browser, select and open the MVR file you
want to import.
Result: The
MVR Import/Merge Wizard appears.
The MVR Import/Merge
Wizard consists of two steps:
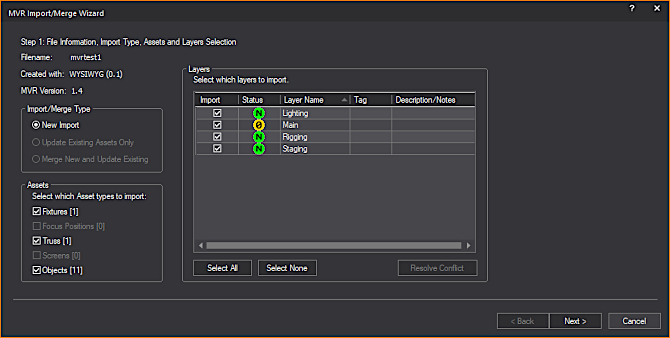
- Step 1: File Information,
Import Type, Assets and Layers Selection window is where
you can select import options.
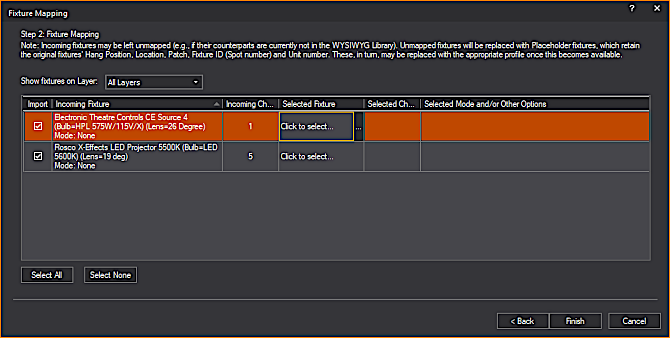
- Step 2: Fixture Mapping is
where you select the Fixtures to import and map them to their equivalent
in WYSIWYG (Library profiles). The Fixture
Mapping window only appears if you selected Fixtures for
import.
The File Information section in
Step 1 displays non-editable information about the MVR file you have selected
to import.
- Filename: The
name of the MVR file.
- Created with:
The name of the application used to save the MVR file with the internal
version number (in brackets) provided by the application where the
file originated.
- MVR Version: The
MVR spec (specification) version used by the application in which
the file was created.
- On the Import Type section,
select the New Import option to
specify that you will import the MVR file for the first time, and
the import will consider everything contained in the MVR file.
- On the Assets section,
select which types of MVR Nodes contained in the MVR file will be
imported. The number within brackets beside each checkbox label indicates
how many MVR Nodes (Assets) from each category are contained within
the MVR file.
Assets
- Fixtures [#]:
The Fixture Nodes contained in the MVR file that you will import must
be mapped to match the equivalent Fixtures in the WYSIWYG Library
Browser. You can map Fixtures on the Fixture
Mapping table that appears in Step 2. Each imported Fixture
will hang from its own 10cm-long pipe.
- Focus Positions [#]:
You must import FocusPoint Nodes to maintain focus of the Fixtures
you are importing.
If the MVR file contains FocusPoint Nodes
and at least one Fixture Node is linked to the FocusPoint and you have
selected the Fixtures checkbox in
the Assets section, the Focus
Positions checkbox is automatically selected by default and
grayed out (disabled). This will ensure that Fixtures always import focused.
Important Note: Focus
Positions will not import if they belong to Layer(s) that are not selected
for import.
- Truss [#]: Truss
Nodes contained in the MVR file such as truss, pipes, and other rigging
structures do not convert to the actual WYSIWYG Truss or Pipes from
which Fixtures hang. Truss Nodes contained in the MVR file will import
as Library Items and stored in the Objects Library > MVR folder.
Truss Nodes imported as Library Items will
not prevent immediate pre-cue or previz because the placement orientation
of Fixtures included in the MVR import will be correct. (This is ensured
by the fact that each imported fixture hangs from its own 10cm Pipe.)
Note: The
Cast Shadow option is automatically
disabled for any Library Item object that was converted from Truss Nodes.
- Screens [#]: VideoScreen
Nodes contained in the MVR file such as projection screens, TV, and
other screen-type objects do not convert to the actual WYSIWYG Screen
objects. VideoScreen Nodes contained in the MVR file will import as
Consolidated Mesh objects. The imported Screen object will retain
the applied image.
- Objects [#]: SceneObject
Nodes contained in the MVR file, such as scenery, furniture, etc.,
will import in WYSIWYG as Consolidated Mesh object or Library Item.
If a single instance of an Object is contained
in the MVR file, the Object will import as a Consolidated Mesh object.
If more than one instance of an Object is contained in the MVR file, the
Objects will import as Library Items and stored in the Objects Library
> MVR folder. WYSIWYG retains the full geometry and textures of imported
Objects.
Note: Assets
will only import if you import the Layers which contain them.
- On the Layers section,
select which Layers contained in the MVR file will be imported. The
Table in this section displays as many rows as the number of Layers
in the MVR file and the following columns: Import,
Status, Layer
Name, Tag, and Description/Notes.
Note: You
cannot rename a Layer or add a Prefix to a Layer name. Incoming Layers
must maintain their original names always.
Tip: Click
any of the column headers to sort the table by that column.
Layers
- Import: In the
Import column, select the checkboxes
of the corresponding rows to import the Layers. By default, all Layers’
Import checkboxes are selected unless
their status displays 0.
- Status: In the
Status column, status icons provide
basic information about the incoming Layers, or indicate which Layers
require attention.
 :
The “Empty” icon indicates that the Layer does not contain Assets
selected for import or contains no Assets at all. It is recommended
that such Layers’ Import checkbox
is not selected (unless you wish to import one or more empty Layers).
:
The “Empty” icon indicates that the Layer does not contain Assets
selected for import or contains no Assets at all. It is recommended
that such Layers’ Import checkbox
is not selected (unless you wish to import one or more empty Layers). :
The “New Layer” icon indicates that this Layer will be added to
the resulting .wyg file.
:
The “New Layer” icon indicates that this Layer will be added to
the resulting .wyg file.
- Layer Name: The
cells in the Layer Name column
are pre-filled and not editable. WYSIWYG must retain the names of
the Layers contained in the MVR file.
- By default, this table is sorted by the Layer Name column.
- When you hover over a Layer’s name cell, the
tooltip lists and counts the Asset types in that Layer.
- Tag: Click and
type on this cell to add a keyword for the selected Layer.
- Description/Notes:
Click and type on this cell to add text information for the selected
Layer.
Tips:
- Click the Select All button
and select or clear any Import checkbox
to select all or clear all the Layers in the table at once. Click
the Select None button to individually
select or clear each Import checkbox.
- Fewer than all Layers may be selected with CTRL+click or SHIFT+click.
- Click Next to
proceed to Step 2: Fixture Mapping of
the MVR Import/Merge Wizard.
If you are not importing Fixtures, click
the Finish button. If this step doesn’t
appear, go to Step 12 of this procedure section.
Result: The
Step 2: Fixture Mapping window appears.
Step 2: Fixture
Mapping window appears only if Fixtures Assets were selected
for import.
Fixture Information and Mapping
In the Fixture
Mapping table:
- You can select which Fixtures to import, and
map them to their equivalents in WYSIWYG (Library profiles).
- All the unique permutations of every fixture
type contained in the MVR file are listed.
- You can filter the table to display the list
of Fixtures that belong to all Layers or display only Fixtures that
belong to a Layer selected for import.
- Fixture information is displayed for accurate
mapping.
The columns in the Fixture
Mapping table:
- Import: Select
the checkbox in this column to import this fixture. By default, all
Layers’ Import checkboxes are selected.
- Incoming Fixture:
The auto-filled cells in this column display the name and other information
about the fixture as these appear in the MVR file. You can only sort
the table list order by this column.
- Incoming Channels:
The auto-filled cells in this column display the number of DMX channels
required by the incoming fixture (based on its operation Mode and/or
other options).
- Selected Fixture:
Click the ellipsis button in the cells of this column to select the
replacement fixture from the WYSIWYG Library
Browser.
- Selected Channels:
The auto-filled/editable cells in this column displays the number
of DMX channels of the replacement fixture.
- Selected Mode and/or Other Options: The auto-filled/editable
cells in this column display the fixture settings you selected in
the Library Browser.
- (This step is optional.) From the Show
fixtures on Layer drop-down list on the Fixture
Mapping window, select All Layers
to display all Fixtures that belong to all Layers in the MVR file
or select a single Layer to display the Fixtures that belong to that
Layer.
- In the Fixture Mapping table,
select the Import checkbox of
the Incoming Fixture you want to map.
Result: The
selected row is highlighted.
- On the selected row, click on the cell under the
Selected Fixture column and click
the ellipsis button that appears.
Result: The
modal Library Browser window appears. The
Search field in the modal Library
Browser will automatically display the previous search when it
opens.
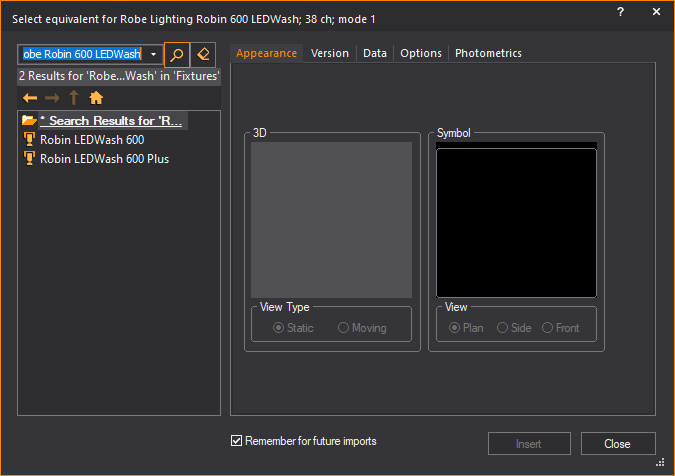
- In the modal Library Browser,
browse and choose the equivalent fixture that will replace the Incoming
Fixture selected for import.
Tips:
- To make it easier for you to select the Fixture's
Mode (and other options), the incoming Fixture's Mode and Channel
Count appear in the Library Browser
title bar.
- To select the correct operation Mode and/or other
options for the mapping fixture, click the Library Browser’s Options and Photometrics tabs;
at the bottom-right of the Options tab,
check the Number of Channels field
in order to ensure that the operation mode and/or other options you
selected above results in the same number of DMX channels for the
mapped fixture as for the incoming fixture.
- When the modal Library
Browser opens again subsequently, it can recall the previous
search by clicking the Search field
drop-down arrow.
- If you select the Remember
for future imports checkbox in the modal Library
Browser, WYSIWYG will automatically map the same fixture that
appears again in the next MVR file import. (You can change the automatic
mapping if required.)
- In the modal Library Browser,
click Insert.
Result:
- The Library Browser closes.
- In the Fixture Mapping table,
the replacement fixture appears in the Selected
Fixture cell, the number of DMX channels appears in the
Selected Channels cell, and the
fixture settings of the inserted fixture appear in the Selected
Mode and/or Other Options cell.
- Placeholder Fixtures:
If you did not find the equivalent fixture replacement, a Placeholder Fixture
replaces the unmapped Fixture with its original attributes retained.
Such Placeholder Fixtures get
a Note automatically, which states which Fixtures from the MVR file
they replaced. This Note appears in their Properties >
Fixture tab, as well as in their
Notes cells in DATA Spreadsheets.
- Repeat Steps 8 to 11 for every Incoming Fixture
you want to map.
Tips:
- Click the Select All button
and select or clear any Import checkbox
to select all or clear all the rows in the table at once. Click the
Select None button to individually
select or clear each Import checkbox.
- Click Back to
go back to Step 1 or click Cancel to
quit the import.
- On the Fixture Mapping window,
click Finish.
Result: The
Import Summary window appears.
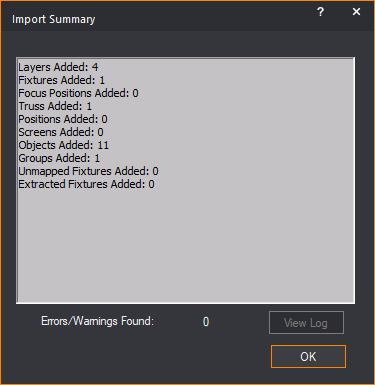
- Click OK.
Result: The
MVR file is imported as a new WYSIWYG document.
For supplementary information on MVR Importing,
see the MVR
importing notes section.
MVR importing notes
Information/notes related
to assets
- Since each imported fixture hangs from its own
10cm-long pipe, the fact that incoming hang structures are not converted
into their WYSIWYG equivalents has no bearing on your ability to import
the MVR and start pre-visualizing (in DESIGN mode) or pre-cueing (in
LIVE mode, after connecting to a console). For all intents and purposes,
imported hang structures and fixtures appear in WYSIWYG the same as
they do in the application that created the MVR file. Should you wish
(or need) to use real hang structures in WYSIWYG, you may re-create
them by drawing Pipes and /or inserting Truss from the WYSIWYG Library;
once done, you will be able to use to move fixtures from their 10cm pipes to the
new hang structures, as long as the fixtures are aligned.
- Groups will always import, but should they contain
fixtures, these will be extracted from the Groups in question, since
fixtures in WYSYWYG cannot be Grouped with other objects. However,
such fixtures’ 10cm pipes will be added to the resulting Groups. Therefore,
if the Layer those Groups are on is made invisible, the fixtures will
become invisible as well.
Notes on the Fixture
Mapping Table
The Incoming Fixtures Column
This column displays the manufacturer,
name (model), operation Mode and other options for the incoming fixtures,
as obtained from the GDTF profiles associated with the fixtures (which
reside within the MVR file). This information is essential for associating
(mapping) the incoming fixtures to the same fixtures from WYSIWYG’s Library.
Please see Potential Issue #2, as
well as the note regarding GDTF Files’ Accuracy
for information regarding the special “DMX Mode” Mode.
The Incoming Channels Column
This column displays the number of DMX
Channels that the fixture requires (based on its Mode – and, for some
fixtures, other options as well). This value is also obtained from the
fixture’s GDTF profile – and the same Potential
Issue (#2) and note regarding GDTF
Files’ Accuracy apply.
The Selected Channels Column
This column is auto-filled with the number
of DMX channels required by the WYSIWYG fixture profile and options you
just selected. If the number here matches the number in the Incoming
Channels cell, there is a very good chance that the mapping
is correct. (On occasion however, different fixture Modes require the
same number of DMX channels, but their functions vary between those Modes;
as such, matching Channel values cannot always guarantee a correct mapping.)
The Selected Mode
and/or Other Options Column
This column is auto-filled with information
about the WYSIWYG fixture profile you selected; it may display more information
than the Incoming Fixture column,
since in some cases, WYSIWYG’s fixture profiles allow for more options
to be changed than GDTF profiles do. (For example, where a GDTF Profile
for a Clay Paky Sharpy may only allow for switching between its two Modes
(Standard and Vector), in WYSIWYG it is also possible to choose whether
or not to use the fixture’s Linear Color function.)
Information/notes related
to fixture mapping
- Spot numbers (in WYSIWYG) are equivalent to FixtureID
numbers on the grandMA 3 console or Channel numbers in VectorWorks.
MVR files exported from the grandMA 3 will (likely) always have FixtureIDs
assigned to fixtures so these will always import. If you require Spot
numbers in .WYG files that result from MVR files exported from VectorWorks
(and you do not want to assign these in WYSIWYG) please ensure that
you’ve assigned the correct Channel
numbers in VectorWorks – and not
Fixture IDs.
- Fixtures’ Unit numbers are not imported in this
version.
- Colours (Gels) assigned to conventional fixtures
are not imported in this version.
- All this time, MVR files cannot carry information
about Gobos inserted into conventional or LED-conventional fixtures.
- Currently, it is beyond the purpose of MVR, to
carry Dimmer, Circuit or any other such fixture information; therefore,
no such information is contained within MVR files.
- Should you make a mistake while mapping fixtures,
if you haven’t clicked Finish yet,
simply click the ellipsis button (…) in the Selected
Fixture cell of the fixture in question, to create a new
mapping. In case you’ve already clicked Finish,
simply access the Properties of
the fixture(s) in question and change their options as needed (via
the Fixture >
Options tab).
Potential issues
in MVR files that may lead to incorrect import results
GDTF Profiles Not Assigned to Fixtures
It is possible for one or more incoming
fixtures, regardless of type (conventional, LED, automated/mover) to appear
in the Fixture Mapping Table with the following Mode information: Mode: DMX Mode and a Channel value
of 1. This will happen when the
file’s author chooses not to, is unable to, or for some other reason does
not assign a GDTF profile to fixtures before exporting to MVR: since the
MVR Specification stipulates that all fixtures in an MVR file must have
a GDTF profile associated with them, when no GDTF is assigned by the user,
a GDTF containing the aforementioned information is created during export.
It is still possible to map such fixtures
correctly (i.e. as intended,
to the appropriate profiles from WYSIWYG’s library) but in order to do
so, the WYSIWYG user must know what Mode and/or other options those fixtures
were intended to be set to. Even so however, importing MVR files which
do not contain proper/actual GDTF profiles for all fixtures within, can
cause problems: if no actual GTDF profile was assigned (and therefore
no operation Mode was defined), all fixtures of the same type will appear
on a single row of the Fixture Mapping Table, making correct mapping impossible
if some are set to operate in one Mode and some in another.
Note regarding GDTF Files’ Accuracy
GDTF files can come from any number of
sources and are not guaranteed to be accurate. In particular:
- The mode names may be incorrect or out of order,
which can be misleading when trying to select the equivalent options
in WYSIWYG;
- Some options that affect the fixture’s DMX footprint
(number of Channels) may not be defined in the GDTF profile even though
the main fixture mode is defined;
- The DMX footprint may be incorrect or incomplete
(e.g., not all circuits or “breaks” may be defined).
As such, when contacting CAST for support
with this, please confirm that you have checked relevant combinations
of options of the WYSIWYG fixture and that you have identified an error
with the DMX footprint in WYSIWYG. To support this, please send the link
to the fixture manufacturer’s official specification, which we can use
to verify that an issue exitss with the DMX footprint – again, in WYSIWYG.
Please also send the MVR file, which we can use for reference.