Materials
Materials differ from textures in that
they do not affect what the objects or surfaces will look like, but rather
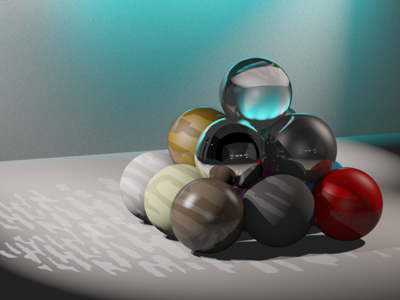
how they interact with light. The result of applying a material is only
apparent in renderings and in Shaded view. Below is an example of a rendering
with materials included:
Objects and surfaces can be assigned both
a texture and a material. You apply materials using the Appearance tab
in the Properties dialog box. You can choose
your preferred material from the list of materials provided with WYSIWYG.
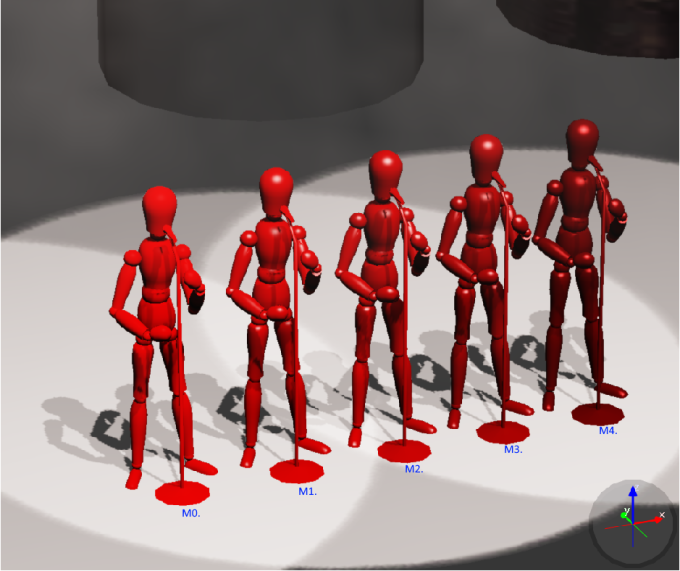
A sample of mannequins, exactly the same except
for the material applied: M0 default settings, M1 Metal 1 (Dull),
M2 Metal 2, M3 Metal 3, M4 Metal 4 (Shiny).
To toggle materials in shaded view
- In view,
from the menu, choose
- In the Simulation tab,
select the Enable checkbox in
the Materials section to display
materials in Shaded view.
To apply a material to an object (surface, object, or venue)
- Right-click the object which you want to apply
the material to, and then choose .
Result: The
Properties window appears.
- In the Properties window,
click the Appearance tab.
- From the Elements list
box, choose the elements to which you want to apply the material.
To choose a custom material for the selected elements (such as metal,
paper, plastic, or fabric) click the ellipsis button (...)
beside the Material box.
Result: The
Material Select window appears.
Tip: When
a material is highlighted in the Material Select
window, a preview of the material applied to objects is displayed.

- In the Material Select
window, navigate to and highlight the desired material, and
then click Select.
Result: The
settings of the element will be configured so that it simulates the material.
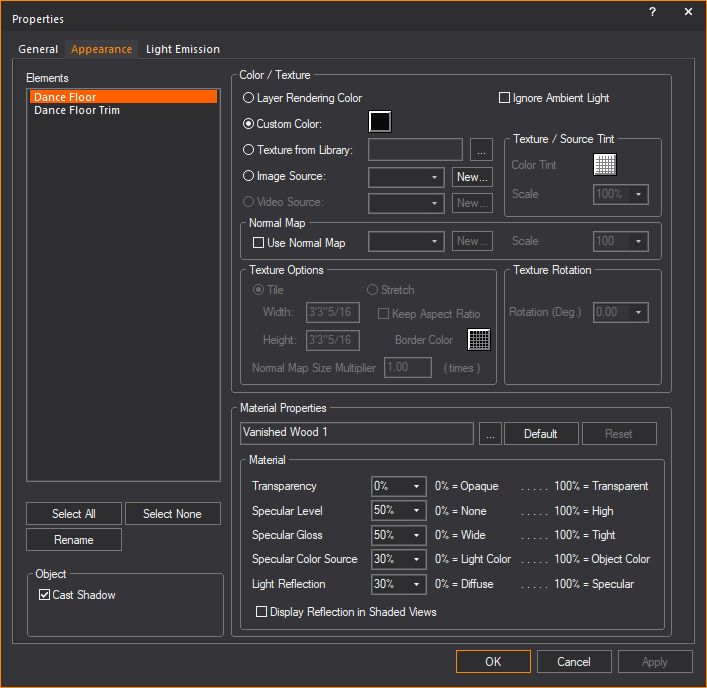
- If desired, you can edit the default properties
of the selected element. The element options vary as follows:
- Transparency:
This setting controls the proportion of light that passes through
the material.
- Specular Level:
This setting controls how prominent other specular effects appear
on the material.
- Specular Gloss:
This settings controls the level of gloss the material will project.
- Specular Color Source:
This setting controls the color of light projected on the material.
- Light Reflection:
This setting controls the amount of light that is reflected off the
material.
Note: From
the drop-down lists, you can change any of the material properties. Use
the Reset button to revert back to defaults.
- Click Apply.
- Click OK.
Material reflections
The reflective properties of a material
can be toggled to enable true reflections in Shaded view. When enabled,
the material will produce a detailed and faithful representation of everything
reflected on its surface.
Attention:
- The number of reflective material surfaces that
WYSIWYG can support is 10. When enabling
reflections on an object, note the number of surfaces that make up
the object. For example, a cube has 6 sides. If an entire cube was
to be reflective, it would use 6 reflective surfaces.
- This limit of 10 reflective
elements is in effect to prevent the Shaded view performance from
degrading to unacceptable levels. Reflections work by rendering each
frame for the Shaded view (to the screen, this has no connection with
Rendering in the Render Wizard) over and over within
each reflective element.
- The Shaded view will be rendered twice per frame
if you add one reflective element; three renderings per Shaded view
frame if you add a second reflective element; four renderings per
Shaded view frame if you add a third reflective element; and so on,
up to the maximum of 10 reflections
which require eleven renderings for each frame displayed.
- We recommend to enable Reflections sparingly,
or in most cases, disable for live simulation/pre-cueing.
Note: Objects
that have reflections enabled will be displayed with a blue bounding box
in the Shaded view.
To apply reflections to an object (surface object or venue)
Note: The
quality of reflection is based on the material properties of the object.
Dull or unreflective materials will reflect poorly.
- In mode,
view, right-click the
object which you want to apply the reflection to, and then choose
.
Result: The
Properties window appears.
- In the Properties window,
click the Appearance tab.
- From the list
box, choose the elements of the object which you want to apply the
reflection.
Note: Remember
WYSIWYG limits the number of reflective surfaces to 10.
- In the section, select the Display Reflection
in Shaded Views checkbox.
- Click Apply.
- Click OK.
- Go to mode,
view.
- Go to .
Result: The
View Options window appears.
- In the View Options window,
click the Simulation tab.
- Under the section,
select the Reflections checkbox.
- Click OK.
Result: Reflective
materials are enabled and demonstrate true reflections.