Importing fixtures
Fixture information listed in a spreadsheet
file (CSV, XLS, XLSX) that was exported from other software and/or lighting
consoles can be imported into your drawing using the Fixture
Import wizard. The fixture objects listed in the spreadsheet
will be inserted into your drawing according to the settings that were
included in the spreadsheet.
Fixture Import option enables you:
- To define the file for import and the unit type.
- To map your file’s column headers to match the
appropriate WYSIWYG fixture property (e.g. Fixture type, position
X Y Z, rotation Rx Ry Rz, Fixture ID, patch, channel, etc.)
- To match fixtures that are not recognized with
the corresponding fixtures from the WYSIWYG Library.
To import fixtures
- In either the Wireframe or
Quad tab (not in Shaded view),
click >
Result: The
Fixture Import window appears.

- In the Fixture Import
section, click the ellipsis button to browse and select the
spreadsheet file with the fixture data you wish to import.
- The file location that was selected will be displayed
in the Fixture Import box.
- Select the Treat first
row as column headers checkbox if you want the first row
of your spreadsheet to be displayed as the column headers.
- In the Spreadsheet is
in section, click the radio button to choose which unit
of measurement were used in your spreadsheet.
- Click Next to continue.
Result: The
Fixture Import Preview window appears
with the fixture data in the table.

- In the row at the top indicated with the blue
arrow, click the drop-down arrows in each column to map your spreadsheet
headers to the appropriate WYSIWYG column headers. For example, starting
with the Type drop-down list,
click to make sure that the matching header is selected. Proceed through
each of the columns to map all the headers of columns that you wish
to import.
Notes:
- For any column that you do not wish to import,
set the drop-down list to Ignore.
- Only fixtures with checked boxes will be imported.
Columns are highlighted in pink color if the data listed are not recognized
and do not match with information in WYSIWYG.
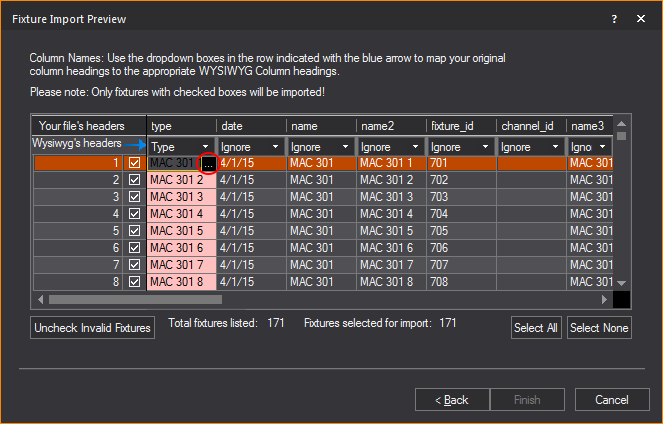
- To correct the invalid data, click on the highlighted
cell(s) and type to change the value, or click on the ellipsis button
to browse the selected fixture attribute.
Result: The
Library Browser window appears.
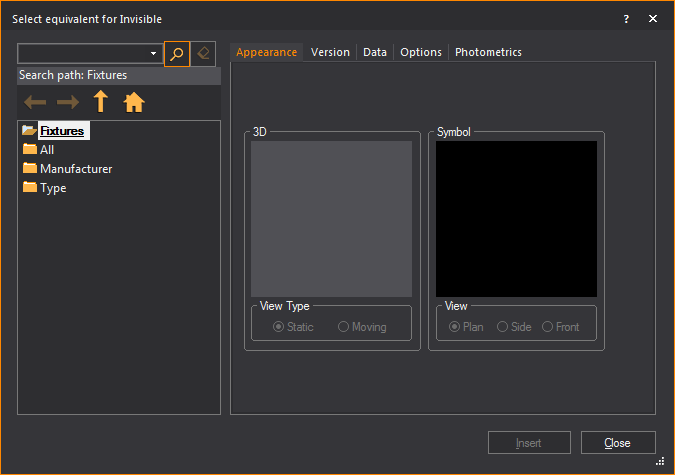
- In the Library Browser window,
browse and choose the object and settings to match the selected fixture
that will be imported.
- In the Library Browser window,
click Insert.
Result: The
WYSIWYG confirmation dialog box appears where you may choose to replace
all instances of the selected fixture type.
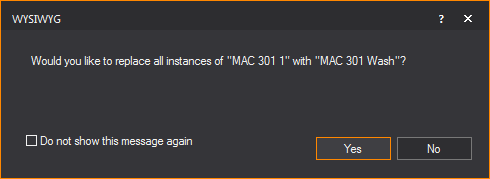
- Click Yes.
Result: The
fixture data in the spreadsheet is replaced with settings that match the
WYSIWYG Library. All selected rows (checkbox in the left-most column)
must have valid information to proceed with the import process.
- You can ignore any fixtures or objects in the
spreadsheet and proceed with the import. Click Uncheck
Invalid Fixtures to select only the valid fixtures without
error settings.
- Click Select All
to choose and import all the fixtures listed in the table.
- Click Select None
to clear all the fixtures and import none.
Note: In the
Fixture Import Preview window, error
messages indicating conflicts are displayed in red text, and the table
columns with the unrecognized fixture data are highlighted in pink color.
The values in the rows can be changed to resolve conflicts.
- Click Finish.
Result: The
fixtures are inserted in your drawing in the specified layout and with
all the settings in the spreadsheet. Every fixture will appear hanging
on its individual hang structure.
Tip: You can
use Relocate Fixtures to relocate
imported fixtures from collinear pipes to other hang structures. For information
on Relocate Fixtures, see Relocating
and cloning fixtures.