Exporting MVR
In this section
Exporting_MVR
Exporting MVR
is only accessible from the menu of
the Wireframe tab in CAD mode. Everything
that is currently visible and only
what is currently visible in the
Wireframe tab will export. If something does not need to be exported,
hide the Layer that the object is on (ensure there are no objects on that
Layer that are
required for export) either by disabling its visibility or by activating
a Scene to which that Layer does not belong.
MVR Exporting Conditions
When you export to an MVR file in WYSIWYG,
the following conditions apply:
- DMX universes:
WYSIWYG converts DMX universe names to numbers when exporting MVR
files containing patched Fixtures because MVR files only accept numbers
as DMX universe names. The
order in which universes appear listed in the Patch Shortcuts is the
order in which they will export.
Any Motion Control universes that are interspersed
with DMX universes in the Patch shortcuts list will
be ignored, and the "Next" DMX universe in the list will
get the next number in the sequence. In addition, DMX universes whose
names happen to be numbers will have no bearing on their export order:
for example, if universes "3", "1", and "4"
appear listed in this order ("from the top of the list"), universe
"3" will be exported as first (1), "1" will be exported
as second (2), and "4" as third (3).
The following table illustrates the above condition:
Universes'
order in the Patch Shortcuts tab |
Universes'
order for Export |
DMX B |
1 |
DMX D |
2 |
Motion 1 |
n/a |
DMX A |
3 |
2 |
4 |
DMX C |
5 |
FOH Movers 1 |
6 |
Motion 2 |
n/a |
FOH Movers 2 |
7 |
Stage Right Booms |
8 |
Motion 3 |
n/a |
Motion 4 |
n/a |
Stage Left Booms |
9 |
4 |
10 |
1 |
11 |
3 |
12 |
Tip: You
can reorder the shortcuts manually by holding down the ALT
key and clicking-and-dragging or use the Manage
Shortcuts dialog box, which opens when you right-click the
Shortcut Bar.
- Layers:
Layers export to <Layer> Nodes. Layers containing Focus Positions
to which exported Fixtures were assigned will always export regardless
of visibility state.
- Fixtures:
All Fixtures except those in the Flight Case
export to <Fixture> Nodes complete with all attributes supported
by MVR.
- Focus Positions:
Focus Positions export to <FocusPoint> Nodes, complete with
their names.
- Focus Lines
and Focus Arcs: Focus Lines
and Focus Arc will not export because MVR makes no provision for such
objects. However, the points along each Focus Line/Arc will export
as individual Focus Points, allowing fixtures to maintain their focus.
- Hang Structures:
All Hang Structures (i.e. drawn Pipes, drawn Curved Pipes, and anything
inserted from the Truss Library) along with their Position names export
to <Truss> Nodes, as 3D meshes like all other 3D entities in
the file.
- Objects:
All objects that are not Fixtures, Hang Structures, or Video Screens
export to <SceneObject> Nodes. The export includes Color, Library
Texture, or its assigned Image Source. Material properties of objects
do not export.
- Screens and
LED Walls: Screens and LED
Walls export to <VideoScreen> Nodes complete with the Image
from an Image Source assigned to them. When a Video Source is assigned,
and no Placeholder is assigned to that Video Source, a random frame
from the video will be exported; since it is possible for such a frame
to be black and/or completely meaningless, using a Placeholder is
recommended. (A Placeholder image could be crafted to identify, for
example, the video feed that's supposed to display on this screen.)
Note: When
exporting Screen objects which have their Only
Display Image/Video on Front Face option enabled (this option is
enabled by default), an additional black-colored surface of the same size
as the Screen is exported 5 mm behind the Screen. (Other software may
not have such an option, and even if it does, MVR cannot be used to enforce
it; the additional surface ensures that the image applied to the Screen
is only visible as in WYSIWYG itself, that is, only from the front.)
- Groups:
- Fixture Groups will not export to MVR since MVR
does not make provisions for such Groups.
- Groups of objects export to <GroupObject>
Nodes.
- Much like in WYSIWYG, Groups (of objects) in
MVR files belong to Layers.
- Unlike in WYSIWYG, where objects within a Group
may belong to any Layers, grouped objects in an MVR file must belong
to the same Layer as their Group. For this reason, when a Group is
exported to MVR, all its component objects are placed onto its Layer
until the export completes. (This is not a permanent change: once
the export has completed, the objects go back to their original Layers.)
- Flight Case:
- Fixtures, Hang Structures, and Focus Positions
located in the Flight Case will not export because they do not have
location data. This includes Focus Positions assigned to Fixtures
that are hung: if a Focus Position is in the Flight Case, it has no
location; therefore any Fixture assigned to it has no "target"
at which to aim.
To export to MVR
- In CAD mode (only), from the
menu, choose > .
Result: The
Export Summary window appears allowing
you to review how many entities of each type will export. Check the numbers
and if they are incorrect based on your knowledge of the file, close this
window to cancel the export.
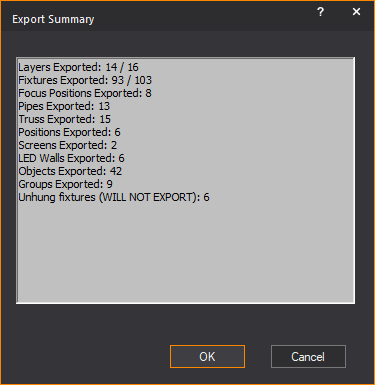
- Click OK.
Result: The
MVR Export window appears.
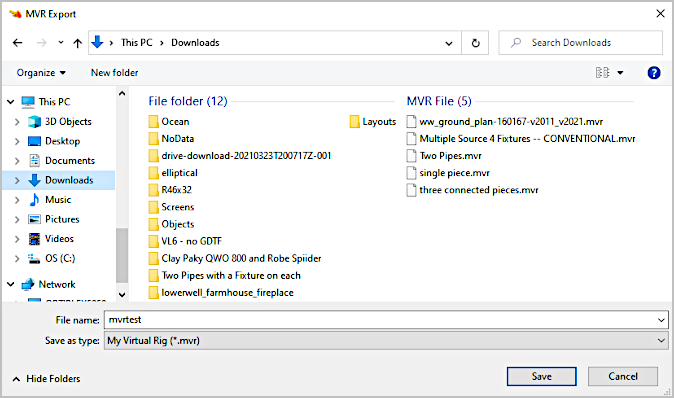
- In the MVR Export
window, navigate to the location where you want to save the exported
MVR file.
- In the File name
box, type the name of the exported MVR file.
- From the Save as type
drop-down list, choose the MVR file type.
- Click Save.
Result: The
MVR file containing the entities in your WYSIWYG plot is saved in the
selected location.