Drawing pipe and drape
Use the Pipe and
Drape Wizard to add lengths of drapery in your drawing. You can
add default length and height of drapery, or specify custom sizes for
your drapery panels, and define drapery properties such as color, texture,
and material.
The several components in a drape line
are shown in the graphic:
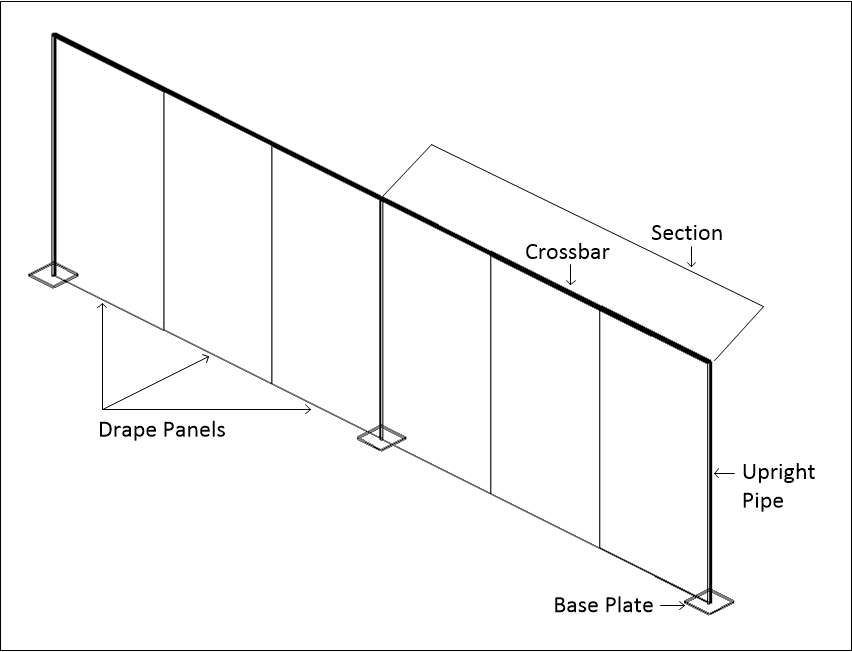
- Drape panels: These
are the individual pieces of fabric that hang from the horizontal
pieces of pipe called crossbars. You can specify the number of drape
panels in each of the pipe and drape drawing methods. The default
number of panels is three per section.
- Section: A
section consists of a series of drape panels hanging from a horizontal
pipe called a crossbar, which is supported on each end by an upright
pipe. You can specify the number of panels per section and, based
on the drawing method you choose, either the exact width of the section
or the maximum width.
- Upright pipes: These
are the pipes that stand on either end of each section in your drape
line, supporting the crossbar pipes.
- Base plates: These
are support plates for the upright pipes.
The Wizard offers you two drawing options:
- Draw: This
option gives you the most flexibility when drawing your drape line.
It enables you to specify the height, maximum width of a section,
and the number of drape panels per section. When you click Finish,
the Wizard returns you to the drawing where you can click and drag
to draw as many drape lines as desired in whatever length required.
- Specify: This
option enables you to define the height, width, the number of sections
in your drape line, and the number of drape panels per section. This
option enables you to either draw a new drape line section, or add
to an existing drape line.
To draw pipe and
drape - Draw method
Note: If you are adding
a new drape section to an existing panel in your drawing, click the snap tool first. This ensures
that the new drape panel “snaps” to the existing one in the correct position.
- From the menu,
choose .
Result: The
Select Drawing Method window appears.
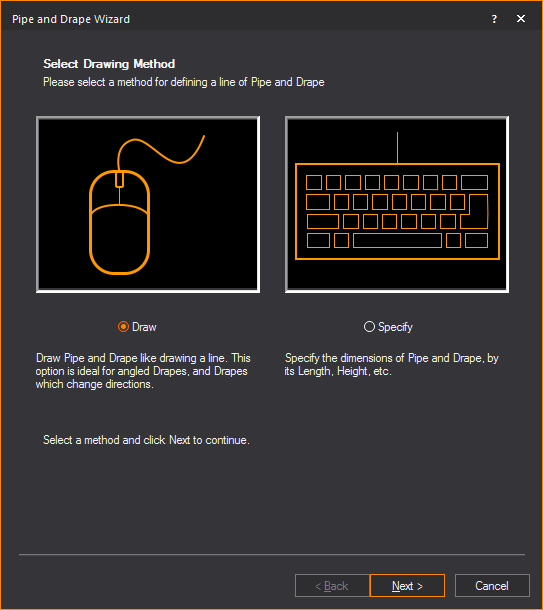
- Click the Draw option
button, and then click Next.
Result: The
Draw Pipe and Drape window appears.
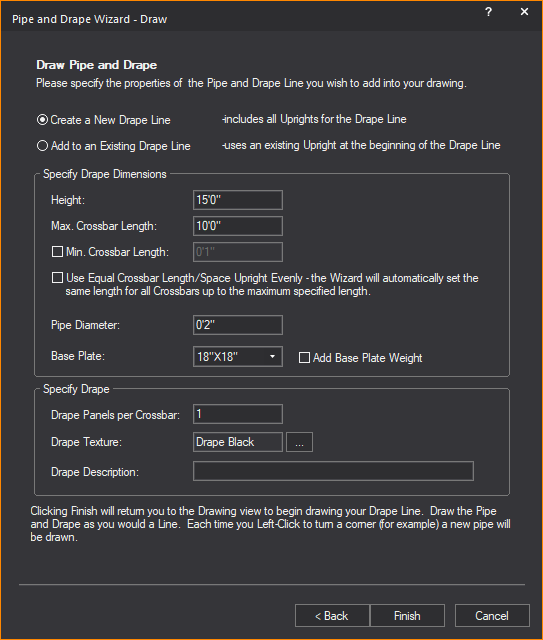
- Select Create a New Drape
Line option to create a new section of the drape line;
or select the Add to an Existing Drape Line option
to add the next section of the drape line.
Notes:
- Drawing a new drape line includes all uprights
for the drape line.
- Adding to an existing drape line uses an existing
upright as the beginning of the added drape line.
- In the Height box,
type the height of the drape line, or accept the default value of
15’0”.
- In the Max. Crossbar Length box,
type the maximum length of each horizontal
pipe, or accept the default value of 10’0”. This value sets the longest
length of the horizontal pipe in a section between the upright pipes.
If you click to insert a section at a shorter interval than this value,
WYSIWYG automatically adjusts the width of each drapery panel accordingly
and a shorter section is inserted in the drawing.
- Select the Min. Crossbar
Length checkbox and type the minimum length of each horizontal
pipe, or accept the default value of 1”. This value sets the shortest
length of the horizontal pipe in a section between the upright pipes.
- Select the Use Equal Crossbar
Length/Space Upright Evenly checkbox to automatically
set the same length for all the crossbars. If you clear this checkbox,
then WYSIWYG creates drapery panels of equal size for all full-size
sections, but resizes the panels in the last section accordingly if
you choose to make this panel smaller.
- In the Pipe Diameter box,
type the diameter of all crossbars and upright pipes.
- From the Base Plate drop-down
list, select the size of the base plate support for the upright pipes.
- Select the Add Base Plate
Weight checkbox to add thickness to the base plate in
Wireframe and Shaded views.
- In the Drape Panels per
Crossbar box, type the number of drape panels that you
want to see in each section of the drape line, or accept the default
value of 1 panel per section.
- The default or previously set texture of the drape
is displayed in the Drape Texture box.
To change the texture, click the Drape Texture ellipsis
button to browse and select a new texture from the Texture
Select dialog box that opens.
- In the Drape Description box,
type additional user information or identification for the drape line,
which will be displayed in Reports.
- Click Finish.
- Click in the desired spot in your drawing where
you want to start drawing the drape line.
- Move the cursor to the spot where you want the
first section to end, and click. Then move your cursor to the spot
where you want the next section to end, and click. You can draw as
many sections as you like. When you are finished drawing your drape
line, right-click and select .
Note: For
information on customizing the new drape line, see To customize drapery elements (color, material,
and texture).
To draw pipe and drape - Specify method
Note: If you
are adding a new drape section to an existing panel in your drawing, click
the snap tool first. This
ensures that the new drape panel “snaps” to the existing one in the correct
position.
- From the menu,
choose .
Result: The
Select Drawing Method window appears.
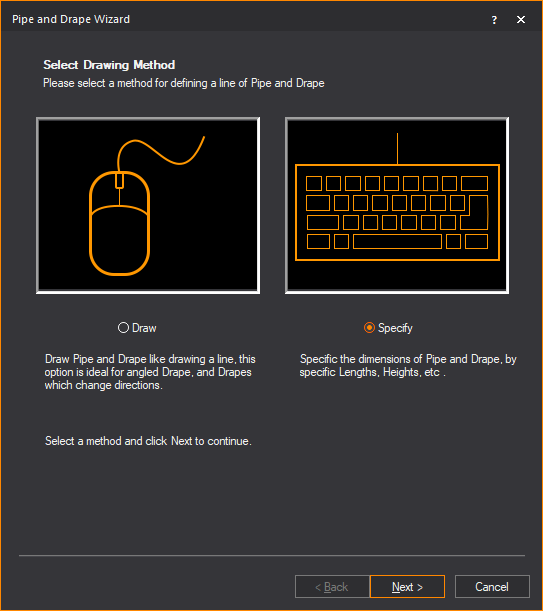
- Click the Specify option
button, and then click Next.
Result: The
Specify Pipe and Drape window appears.
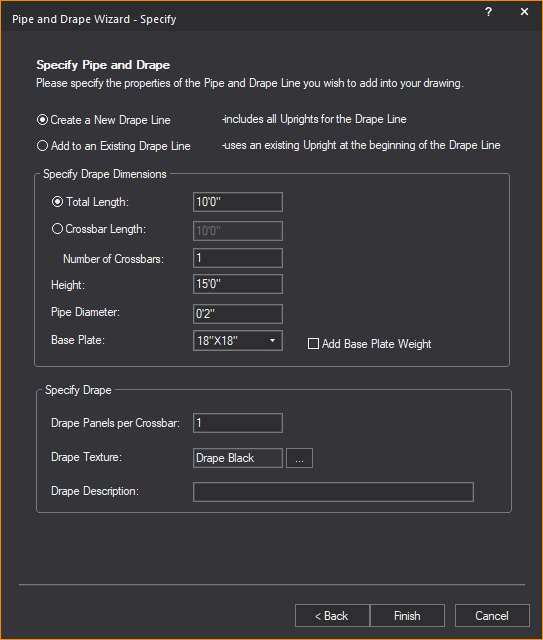
- Select the Create a New
Drape Line option to create a new section of the drape
panel; or select the Add to an Existing Drape
Line option to add the next section of the drape panel.
Notes:
- Drawing a new drape line includes all uprights
for the drape line.
- Adding to an existing drape line uses an existing
upright as the beginning of the added drape line.
- To specify the total length of the drape line
section, select Total Length and type
the length of the drape line, or accept the default value of 10’0”.
The Crossbar Length option is
disabled if the Total Length option
is selected.
- To specify drape line section by the length and
quantity of it’s crossbars, select Crossbar
Length and type the length of the crossbar, or accept the default
value of 10’0”. The Total Length option
is disabled if the Crossbar Length
option is selected.
- In the Number of Crossbars box,
type the number of crossbars in the drape line, or accept the default
value of 1.
Note: The
length of each crossbar will automatically change with reference to the
specified Total Length and Number
of Crossbars.
- In the Height box,
type the height of the drape line, or accept the default value of
15’0”.
- In the Pipe Diameter box,
type the diameter of all crossbars and upright pipes.
- From the Base Plate drop-down
list, select the size of the base plate support for the upright pipes.
- Select the Add Base Plate
Weight checkbox to add thickness to the base plate in
Wireframe and Shaded views.
- In the Drape Panels per
Crossbar box, type the number of drape panels that you
want to see in each section of the drape line, or accept the default
value of 1 panel per section.
- The default or previously set texture of the drape
is displayed in the Drape Texture box.
To change the texture, click the Drape Texture ellipsis
button to browse and select a new texture from the Texture
Select dialog box that opens.
- In the Drape Description box,
type additional user information or identification for the drape line,
which will be displayed in Reports.
- Click Finish.
- Click in the desired spot in your drawing where
you want to start drawing the drape line.
- Move the cursor to the spot where you want the
first section to end, and click. Then move your cursor to the spot
where you want the next section to end, and click. You can draw as
many sections as you like. When you are finished drawing your drape
line, right-click and select .
Note: For
information on customizing the new drape line, see To customize drapery elements (color, material,
and texture).
To quickly change pipe and drape wizard settings
This procedure shows you how to quickly
change some of the structural pipe and drape settings for a selected drape
line, such as the height and diameter of the upright pipes and crossbars.
Use this procedure to customize the structural properties of a single
drape line.
- In your drawing, select the pipe and drape sections
that you want to customize.To select multiple sections, press CTRL, and then click the appropriate
sections.
Note: The
sections that you select must have been drawn in the same way. For example,
all drape lines created with Specify method.
- Right-click and select .
Result: The
appropriate Settings window appears. Based on the type of drape line that
you selected, a different window appears.
- Change any of the settings that you see in this
window. For help on any of the boxes, click in the box, and then press
F1.
- Click Finish to
save and apply your new settings.
To customize drapery
elements (color, material, and texture)
You can add custom color, texture and material
to selected drapery elements (such as the front and back of the drape
panels, the crossbars, upright pipes, the drape loops that attach to the
crossbars, or the drape lines as a whole).
Notes:
- If you select multiple drape lines in your drawing,
you can apply the same properties to all of them simultaneously through
the following procedure. However, note that if you had already selected
varying properties (for example, if you had chosen one color for the
front panel of some drape lines, but another color for the front panel
of others), or if some of the elements had no properties selected
at all, then when you choose new properties in the following procedure,
it applies to all drape lines selected, overwriting any existing settings
that you may have saved.
- When you select multiple drape lines, the Appearance tab only lists the properties
of selected elements if they are common across all drape lines. For
example, if the front panel of all selected drape lines already has
the same custom texture applied, and it is set to tile in one meter
squared intervals, then these values are shown in the Appearance tab.
However, if at least one of the front panels in the selected drape
lines has a different custom texture value applied, the Appearance tab
does not list the texture settings at all. If you choose new texture
settings, your choice overwrites all existing settings for the selected
element across all selected drape lines.
- You can apply the same properties to all drapery
elements by highlighting “Group” in the Elements box.
- In your drawing, select the pipe and drape sections
that you want to customize. To select multiple sections, press CTRL, and then click the appropriate
sections.
- With the desired sections selected, right-click
and select Properties.
Result: The
Properties window appears.
- Click the Appearance
tab.
- In the left pane, click the drapery element that
you want to customize. For example, to customize the front of the
drape panels (each panel is double-sided), click Drape
Front.
Note: You
can select multiple elements by pressing CTRL,
and then clicking the elements; you can select all elements
by clicking Select All.
- You have a choice of applying one of
the following settings to the selected elements:
- Layer Rendering Color:
Select this option to apply the same color as the current layer to
the selected elements.
- Custom Color:
Select this option and click the color box to apply a custom color.
In the resulting color dialog box, select the custom color that you
want to use, or click Define Custom Colors to
create your own color.
- Texture from Library: Select this option to apply a custom
texture file from the WYSIWYG library to the selected elements, and
then click the ellipsis button (...). In the resulting dialog box,
navigate to and choose the desired texture.
- Image Source: Select this option to apply a custom
texture file that you have created and saved in either .bmp, .jpeg,
.png, or .gif format. For information on image sources, see To
create a new image source in the Image Manager.
- Video Source:
Select this option to apply a video source or a subsource as a “dynamic
texture”. Choose a previously created video source or subsource, or
create a new video source or subsource. For information on video sources,
see Video
Manager.
- Use Normal Map:
Select this option to apply an Image Source that is a Normal Map,
to create the perception of fragmented surface texture detail and
depth, making objects look more realistic.
Select from the drop-down list an existing
Normal Map image or click New to create
a new Normal Map image via the Image Manager.
Note: This
drop-down lists all Image Sources that appear in the Image
Manager; as such, Image Sources which are Normal Maps should be
named appropriately for easy identification.
- Scale: Select
the height or depth of visual effect created by the Normal Map. Select
from the drop-down list, the percentage scale value from not visible
(0%) to maximum value stored in the imported Normal texture/image
(100%).
- If you have chosen to apply a texture to the elements,
you can choose how the texture will appear on the selected drapery
elements as follows (if you have applied a color instead, you can
skip directly to step 7):
- To view the texture file as a series of square
or rectangular “tiles” that are repeated over the entire surface of
the drapery element, click the Tile option
button, and then type the size of the tiles in the boxes provided.
- To view the texture file stretched out as a single
surface over the entire drapery element, click the Stretch
option button.
- To preserve the aspect ratio of the texture so
it is not distorted when stretched over the element, click Keep
Aspect Ratio.
- To choose a custom border color for the texture
when it is stretched over the surface of the element, click the Border Color box, and then choose the
custom color.
- If you have selected Use
Normal Map, specify the number of times the Normal Map is multiplied
across the object (element) to which it is applied. Type the value
in the Normal Map Size Multiplier box.
(Enter a valid number between 0.01 and 100.)
Notes:
- The default value of 1 results in no changes
to the Normal Map’s size; values lower than 1 will increase the
size of the Normal visual effect, and values higher than 1 will
decrease it.
- The Normal Map Size
Multiplier operates within the Tile or
Stretch Texture Options.
- To set the angle at which the texture appears
on the drapery element, type or select the value in degrees from the
Rotation (Deg.) drop-down list.
- To change the color of the texture, click the
Color Tint color box and select
a new color, then click the Scale drop-down
list box to specify the intensity of the color.
- To choose a custom material for the selected drapery
elements (such as metal, paper, plastic, or fabric) click the ellipsis
button (...) in the Material Properties
section.
- In the resulting dialog box, navigate to and highlight
the desired material, and then click Select.
- Click Apply.
- You can apply a transparency level to the selected
element. Based on the settings that you have chosen for color, texture,
and material, the transparency options vary as follows:
- Transparency: This
setting controls the proportion of light that passes through the material.
All materials in WYSIWYG specify a level of transparency that varies
from one material to the next. For example, glass is more transparent
than brick. If you select Default, the transparency level is set to
0% (opaque).
- Specular Level:
This setting controls how prominent other specular effects appear
on the material.
- Specular Gloss:
This setting controls the level of gloss the material will project.
- Specular Color Source:
This setting controls the amount of light that is projected on the
material.
- Light Reflection:
This setting controls the amount of light that is reflected off the
material.
Notes:
- From the drop-down lists, change any of the material
properties. Use the Reset button to
revert back to defaults.
- The beam will pass through a surface with the
Transparency value set to 80% or greater. The beam will not pass through
the surface when the value is lower than 80%.
- Select Display Reflection
in Shaded Views checkbox to display the set reflective
characteristics in Shaded Views.
- Click Apply.
- Click OK to
save your changes and close the Properties
dialog box.
To customize pipe and drape structure for individual drape
lines
This procedure shows how to the structural
properties of individual drape lines that you have selected.
Note: While
the tabs in the Properties window are best
used to customize a single drape
line, if you have selected multiple drape lines, the values that you type
in these tabs apply to all selected
drape lines; they overwrite any custom settings that you may have previously
saved for individual crossbars, uprights, or drape panels.
- In your drawing, select the pipe and drape section
that you want to customize.
- With the desired section selected, right-click
and select .
Result: The
Properties window appears.
- On the Properties window,
click the Pipe and Drape tab.
Pipe
This section displays the properties of
the drape line crossbars and upright pipes.
- Crossbar section:
- Length: Type
the length of all crossbar pipes in the selected drape line.
- Diameter:
Type the diameter of all crossbar pipes in the selected drape
line. Updating the crossbar diameter will update the loop diameter.
Upright
- Height: Type
the height of all upright pipes in the selected drape line. Changing
the upright height will update the height of the drape line.
- Diameter:
Type the diameter of all upright pipes in the selected drape line.
- Base Plate:
Select from the Base Plate drop-down
list, to change the size of the base plate support for the upright
pipes.
- Select the Add Base
Plate Weight checkbox to add thickness to the base plate
in Wireframe and Shaded views.
- Use Document Defaults
(Segments): Click to clear this checkbox if you want to specify
the number of segments that comprise the circumference of the crossbar
pipes. You can choose between three and 40 segments. This value is
largely for rendering purposes—the greater the number of segments,
the greater the rendering time. Leave this checkbox checked to accept
the default value of 8 segments.
Drape
This section displays the properties of
the drape line panels.
- Panel section:
- Description:
Type to add or replace the additional information for the drape
line.
- Height: Type
the height of all panels in the selected drape line.
- Width: Type
the width of all panels in the selected drape line.
- Loop Diameter:
Type the diameter of the loops that wrap around the crossbar pipes
at the top of all panels in the selected drape line. This value
should be greater than the diameter of the crossbar pipes.
- Use Document Defaults
(Segments): Click to clear this checkbox if you want to
specify the number of segments that comprise the drape panel loop
that wraps around the crossbar pipe. You can choose between three
and 40 segments. This value is largely for rendering purposes—the
greater the number of segments, the greater the rendering time.
Leave this checkbox checked to accept the default value of 8 segments.
- Notes: Type
additional user information for the drape line.
- Curtain
- Enable: Select
this checkbox to display the curtain as a wave in Plan View.
- Curtain Folds (2D Plan
Only)
- Style: Choose
the style of how the wave is displayed.
- Depth: Type
the depth of each wave period.
- Width: Type
the width of each wave period.
- Number of Segments:
Type the number of segments for the 2D wave object.
- Click Apply.
- Click OK.
Result: Your
changes are applied to all selected drape lines.