 The
New button.
The
New button.
This section provides information on how to work with your WYSIWYG document.
In this section
The File menu contains the basic commands required to manipulate your WYSIWYG document.
The File menu is the same in all the modes.
The New command creates a new show document. If another show document is currently open, you will be prompted to save changes to that document before a new untitled file is created. Only one show document may be open at a time.
From the File menu, choose New.
Tip: You can also use the New tool on the Standard toolbar.
The
New button.
The New Project command creates a new project folder with the new show document (.wyg file) and all its associated files automatically stored within the My Projects folder, or you may specify a different folder path for the new project folder.
Tip: You can also specify the path and location to which you will save the project folder, in the Location cell.
The Open command opens a previously created show document. If another show document is currently open, you will be prompted to save changes to that document before another show document is opened. Only one show document may be open at a time.
You can open the following file types:
The Open Project command opens a previously created project folder which contains the saved show document with all its associated files.
From the File menu, choose Open Project.
Result: The My Projects folder opens to display the stored projects.
The Save command saves the open document to the same file name and location (folder, disk, and so on) under which it was previously saved. If you are saving the document for the first time, this command will perform the Save As function.
From the File menu, choose Save.
Tip: You can also use the Save tool on the Standard toolbar.
 The
Save button.
The
Save button.
The Save As command is used to save the current document to a new file name, a new file type, or new destination, such as an external hard drive.
Note: WYSIWYG allows you to save an object or group of objects contained within your document as a separate file.
Result: The Save As dialog box appears.

The Save As Project command is used to save the current project folder to a new project folder name containing the new file, and into the new folder location.
Tip: You can also specify the path and location to which you will save the project folder, in the Location cell.
Result: The project folder with the new name is stored in My Folders, or saved in your specified folder and location.
The Package Project as Zip command packs the folders in the project into a zip file, with the option to select which files to include, and the option to include the external images and video used in the file.
Tip: You can also specify the path and location to which you will save the zip package, in the Location cell.
Result: The Project Files dialog box appears.
Result: The zip package is saved and stored in My Projects folder, or saved in your specified folder and location.
The WYSIWYG Save As command lists a file type called.WYT. WYSIWYG template files are similar to the type of template file you may use on your word processor to set up fax cover sheets, memos, or letters. Once you have drawn your venue with all of its lighting positions and everything else that is common to all shows, save it as a .WYT file in the \Templates directory. Each time you start a new drawing, that file will be available as a template to start from.
You can also enter all your lighting equipment inventory into the Flight Case and save that as a template. When users start their drawings with your template, they will not have to choose from an endless list of fixtures but rather just what you have in stock.
This is also the ideal option for saving your preferred working settings. Template files save all the shortcuts including custom reports, plots, and so on. However, toolbar settings are not saved in template files since they are saved by the application.
A list of most recently opened template files appears under the heading Create New Plot on the WYSIWYG welcome screen. The more... link will prompt you to open a template file from the WYSIWYG Templates directory.
Starting from R41, you can save back to earlier releases of WYSIWYG for up to four (4) releases back of the current release. For example, from R41, you can save back to earlier releases R40, R39, R38 and R37.
This menu command exports the current show document to the following file formats:
Note: The MVR Export function may only be accessed from the Wireframe view tab in CAD mode.
Note: The glTF Export function may only be accessed from the Shaded view tab in CAD mode.
This command opens the Floorplan Importing Wizard to import existing floorplans saved in Bitmap, JPEG, GIF, TIFF, PNG, Targa, or PDF into your show document. You can import floorplan images in Plan, Front/Back, or Left/Right views. For more information, see Importing floorplans.
This menu command opens the Fixture Import wizard to import fixture information listed in a spreadsheet file that was exported from other software and/or lighting consoles. The fixture objects listed in the spreadsheet will be inserted into your drawing according to the settings that were included in the spreadsheet. For more information, see Importing fixtures.
WYSIWYG ships with several files that contain sets of pre-configured objects called “Insertables”. Insertables can be merged into your current file and inserted as needed. WYSIWYG also allows you to create and save your own insertables.
If a part of your file has objects that you would like to reuse again, you can save it as an insertable. This is similar to merging one WYSIWYG file into another one, but the insertable will be listed conveniently for you in the Insert Insertable dialog box.
Note: The object will be saved exactly as it appears in the file, with the same properties.
Result: The Create Insertable dialog box appears.

Result: The insertable will be saved. You can now insert it into any file from the Insertables... menu.
Result: The Insert Insertables window appears.
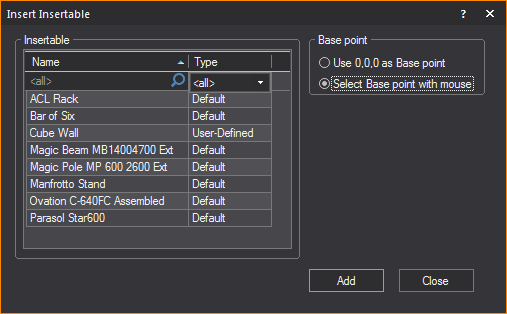
Result: The insertable is inserted into the file.
Purge enables you to lower your file size by ridding the file of unused data such as old images, old renders, unused Layers, lighting positions, imported items from AutoCAD or SketchUp, and so on.
Note: Once you purge objects from your file, the action cannot be undone.
Result: The Purge window appears.

The Merge command is used to combine multiple show documents into one. All file types that can be opened directly by WYSIWYG can also be merged. Therefore, an existing WYSIWYG document can be merged with
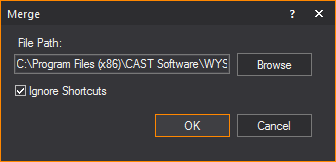
Result: The Merge > Basepoint dialog box appears.

Result: The Layer Import window appears. This window enables you to rename layers instead of combining them and will display the state of the layer in both files.

Tip: It is typically sufficient to accept these settings and click Finish. This dialog box shows you which layers don't already exist and will be added, and which already exist and will have objects merged into them. By using the drop-down menu in the Action column, you can rename layers instead of merging objects to your existing layers, which can help keep your file clean.
Result: The file you selected is merged with the current file.
Note: For information on merging MVR, DWG/DXF, or SketchUp files, see Merging_MVR, Merging a dwg/dxf document, and To merge sketchup files.
The Close command closes the current show document and returns you to the Welcome window.
Note: Click No to skip saving and close the document. Click Cancel to skip saving and keep the document open.
The Print command varies from mode to mode. In general, this command prints the active view to the selected printer.
From the File menu, choose Print.
Result: Based on the mode you are in, the program may print the document directly or it may open the following dialog box so that you can set printing options:

Note: While you can print from CAD mode, it is strongly recommended that do not do so. Instead, please create a Layout and print it from PRES mode. For details, see Creating a new layout and To print a layout.
The Print command opens the Print dialog box.
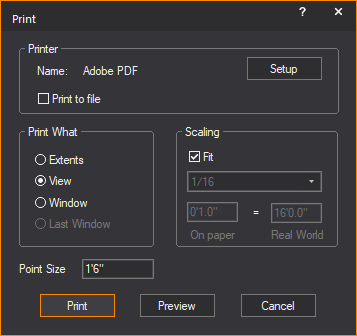
This dialog box displays the printer that is used to print your WYSIWYG document. The printer shown is the default printer that you have set up in Windows. Click Setup to change the printer or printer settings.
Select the Print to File checkbox to print your WYSIWYG document to a file instead of to a printer. When you print, WYSIWYG prompts you to enter a file name and path.
The Print command prints the active window using the options you specify.
Print What options:
Scaling options:
The value in the Point Size box is the size at which points are printed.
While it is possible to print your drawing directly from the CAD mode, it is preferable to print plots from the PRES mode. PRES mode includes the ability to lay out your plot with multiple views, reports, borders, and title blocks. For more information on printing plots, see Printing layouts.
Print Preview displays the document as it will look when printed. This allows you to double-check that the printed output is exactly what you want.
The Print Setup dialog box allows you to choose the print destination, the page orientation and size, and paper tray (if applicable). The print destination may be a physical printer, or it may be a file type or fax program, for example. Paper size and source options will correspond to the printer type selected.
The list of recent files at the bottom of the File menu gives you quick access to the last four files opened. This list will continually update as show documents are opened. If the file you are looking for is not on this list, use the Open command.
Use the Exit command to exit WYSIWYG. If you have made changes to your document but have not saved yet, you will be prompted to save your changes before exiting.
Note: Click No to skip saving and exit WYSIWYG. Click Cancel to skip saving and not exit WYSIWYG.
![]() © CAST Group of Companies Inc., 2002-2021
All rights reserved.
© CAST Group of Companies Inc., 2002-2021
All rights reserved.