This section provides instructions on how to install, configure, activate, and register the WYSIWYG software. You must activate and register the software before you can start using WYSIWYG.
This section provides instructions on how to upgrade WYSIWYG software. Your WYSIWYG Membership is valid for a specific period of time. Follow the instructions in this section to renew your Membership.
In this section
Customer Experience Improvement Program (CEIP)
Configuration, activation, and registration
The installation procedure for WYSIWYG is the same regardless of the level that you have purchased. To download the WYSIWYG installer, you must login to the Members Only Area of CAST Software’s website, https://cast-soft.com/cast/member/. Once the download is complete, double-click on the downloaded file to begin the installation. Follow the steps in the installer and ensure that you do not plug the dongle into your computer until prompted to do so by the installer.
Result: The WYSIWYG - InstallShield Wizard appears.
Note: The executable files (.exe) and the installer for WYSIWYG R47 have been signed with a digital certificate. The Publisher is listed as: Cast Group of Companies Inc.
All versions of WYSIWYG include an AutoUpdate feature which allows for automated checking for updates every time the software starts - as long as the computer is connected to the Internet. Updates are generally intended to address problems in the software, but can include, at CAST Software’s discretion, Library updates and/or minor feature enhancements. When an update is found, it may be downloaded and installed.
Note: It is not possible to use AutoUpdate to install a brand new version of WYSIWYG; new versions must be downloaded and installed on their own. (For example, it will not be possible to use AutoUpdate to upgrade from R47 to R48 or beyond.)
By default, WYSIWYG automatically checks for updates every time it starts.
Tip: To turn off automatic checking for updates, clear the Check for updates Automatically checkbox in the General tab of the Applications Options window.
From the Help menu on the Welcome Screen, choose Check for Updates.
Notes:
When an update is found, a window appears with the list the problems it fixed, along with anything else it includes. We strongly recommend that you review this list as it always contains important information.
Result: Once the download completes, a dialog box appears prompting that the installation will begin.
Tip: If you change your mind about installing the update, wait for the installer to load and then cancel it. You will be reminded about the update again the next time WYSIWYG starts.
On the AutoUpdate window, click the Later button.
Result: This will postpone further automatic checks for seven days.
We are always looking for new ways to improve our products. Our Customer Experience Improvement Program (CEIP) allows you to contribute to the features, design, and development of WYSIWYG. You can provide us with various information about hardware configurations, features you use most (and least), and the problems you encounter. We can improve the features you use the most based on the information we collect through the Customer Experience Improvement Program (CEIP).
We encourage you to participate in giving us feedback to get the most positive experience with our products. The Customer Experience Improvement Program dialog box appears during the installation process to offer the option to participate. When enabled, the program runs automatically in the background, and will not interfere with your work in any way. CEIP will collect general information that will lead to software improvements and enhanced functionality. For more information, please visit http://cast-soft.com/ceip/.
Participating in the CEIP enables the Message Center feature that displays a message dialog box when WYSIWYG opens. This messaging feature allows CAST to deliver important messages to users through the software. For example, if we want to share information to all users, or to only some users (based on information collected through CEIP), we would be able to send it through Message Center. Also, if there are any critical issues discovered, or solutions (e.g. update your graphics drivers to avoid a crash), we can send this information directly through WYSIWYG, and you will see it the next time you launch the software. You must enable CEIP to receive these messages.
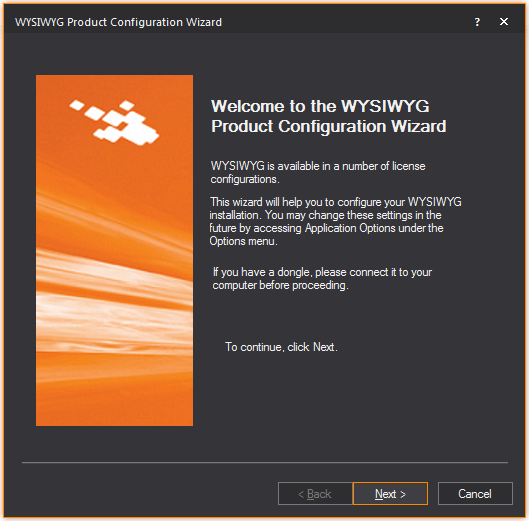
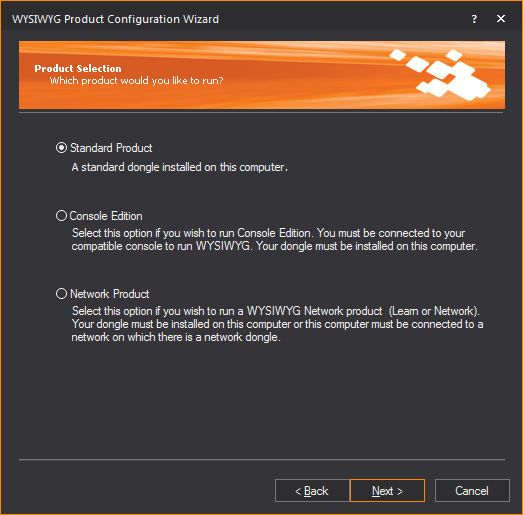
After installing the product, when you launch WYSIWYG for the first time, the Product Configuration Wizard appears, enabling you to choose the product level that you want to run. You can choose from standard product levels (such as Design and Report), Network products, or you can run the Demo or Viewer versions of WYSIWYG.
To run any of the products listed in the Wizard, you must first have the appropriate dongle installed on your computer (to run a network product, you must have a network dongle installed on a computer that is accessible from your PC).
Note: Before you perform this procedure, ensure that you have the correct dongle installed on your computer, or that the network dongle is installed on a computer that you can access from your PC.
Result: The WYSIWYG Launching Screen appears with the progress bar while WYSIWYG is preparing to load, and then the WYSIWYG Product Configuration Wizard appears.
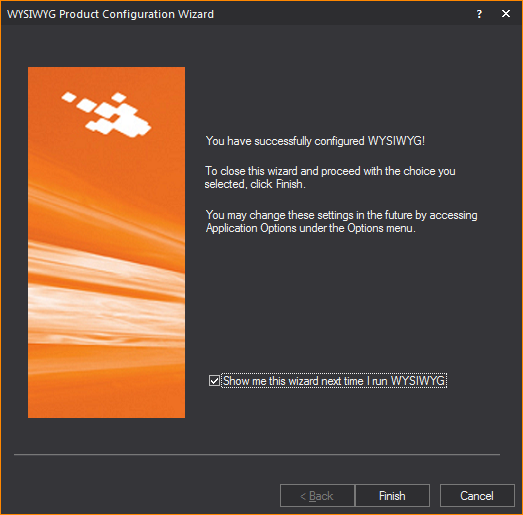
Note: If you clear this checkbox, you can always set it again in the Application Options window. For details, see General tab.
Result: The Product Selection window appears, enabling you to choose the product level that you want to launch.
Result: The program verifies that you have the correct dongle attached.
Reauthorization requires that all WYSIWYG Members “reauthorize” their dongle periodically by logging into the WYSIWYG Members Only Area (https://cast-soft.com/cast/member/index.php), getting their Dongle Reauthorization Code, and then applying this code to the dongle.
This initiative will help safeguard your dongle, ensuring that if it is lost, stolen, or found by someone else, it will be useless beyond the reauthorization date.
All dongles have a Reauthorization Expiry Date. Exactly 30 days prior to this date, regardless of when your Membership expires (or expired), every time you open WYSIWYG a window appears, requesting that you supply a Reauthorization Code for your dongle or the program will cease to function.
Note: You have 30 days from the first appearance of the Reauthorization window to complete the process. To postpone the process during this period and continue working in WYSIWYG, click Later in this window. At the 30-day mark, however, you must reauthorize your dongle or WYSIWYG will cease to function (until you complete the process).
Note: You require an Internet connection to perform this procedure.
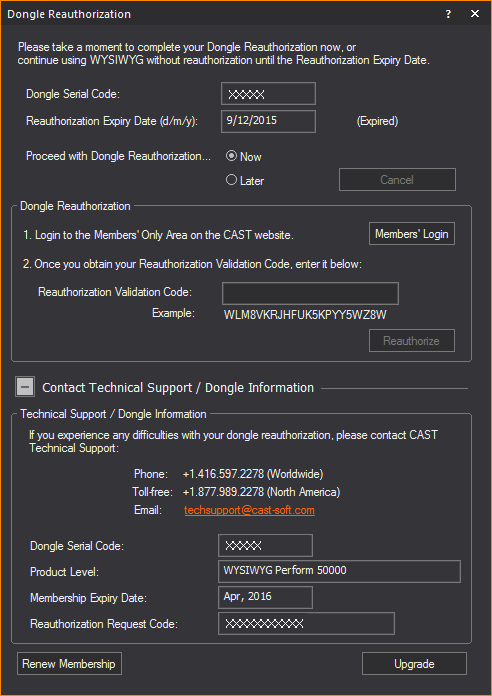
Result: The steps for completing reauthorization becomes accessible in the Dongle Reauthorization window.
Note: If you do not wish to perform reauthorization at this time, select the Later radio and click the Later button at the top right of the Dongle Reauthorization. This option is only available during the 30 days leading up to the reauthorization expiry date.
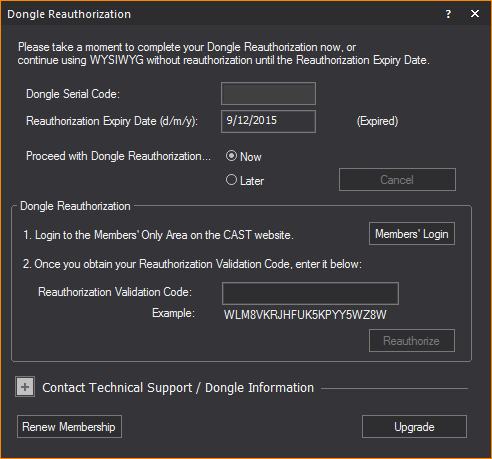
Result: The WYSIWYG Members site opens in your Internet browser to begin the reauthorization process.
Note: If you do not have an account, you must create one by entering your contact details and selecting a password. Ensure that the email address you provide is valid.
Result: The browser will list your Reauthorization Validation Code.
Result: A Reauthorization Successful message appears.
Result: WYSIWYG launches. Your dongle is reauthorized.
Note: You require an Internet connection to perform this procedure so that the information you provide can be validated by our servers. Unlike registration, reauthorization cannot be performed over the phone.
An upgrade code enables you to run the advanced features of a higher level product, either Design or Perform, using the same dongle that you already own. Contact your local WYSIWYG dealer to purchase an upgrade. You will be given an upgrade code at the time of purchase.
A downgrade code will also enable you to scale back and run features of a lower level product using the same dongle that you already own. The procedure to downgrade your product is the same as for Upgrades.
Note: Product Downgrades will only become available with the Perform Lite Product, after the initial release of R47.
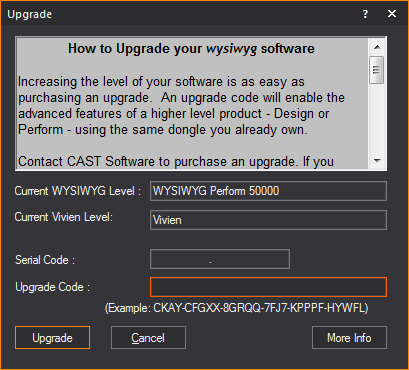
The current level of WYSIWYG installed on your computer is displayed in the Current Level box. The serial code of your dongle is shown in the Serial Code box.
Result: The new level of software is displayed in the upper right corner of the WYSIWYG user interface.
Note: If you would like to purchase an upgrade but are unsure of who to contact, click More Info to obtain a list of WYSIWYG dealers.
Two options for running WYSIWYG: you can purchase a Membership, or you can lease a WYSIWYG dongle.
When you purchase a Membership to WYSIWYG, you purchase the dongle. Your Membership is valid for a specific period of time, during which you can take advantage of all new software updates and releases. You can easily view and renew your Membership from within WYSIWYG by following the procedure in Obtaining membership details.
Leased dongles carry the same privileges as purchased ones (for example, software updates, library updates, and technical support). However, unlike purchased dongles, once the lease is over, WYSIWYG will no longer run with that dongle, giving you the choice of renewing the lease or purchasing the dongle (and therefore entering the Membership program.
Please see https://cast-soft.com/faq/#membership for information regarding the differences between Memberships and Leases.
Details of your Membership are stored within WYSIWYG.
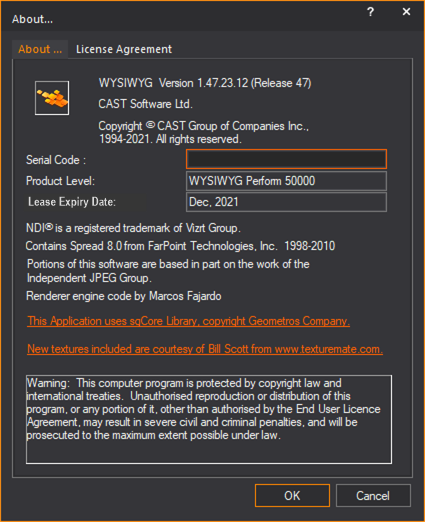
From the Help menu, choose About WYSIWYG.
Result: The month and year that your Membership expires is displayed in the Membership Expiry Date box.
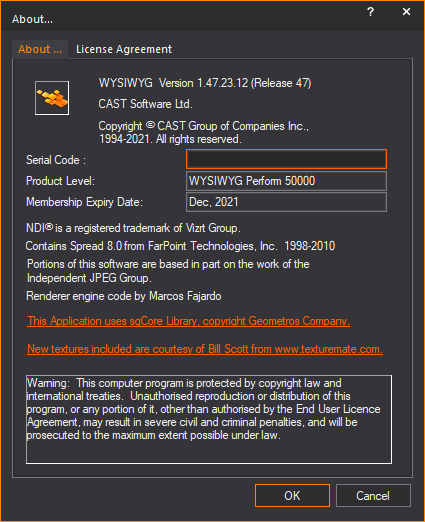
NDI® is a registered trademark of Vizrt Group. See https://www.ndi.tv/.
Your WYSIWYG Membership is valid for a specific period of time. You can continue to use WYSIWYG beyond your Membership expiry date; however, you will not be able to access software updates until you renew your Membership.
Contact your local WYSIWYG dealer to purchase a renewal for your Membership. CAST Software provides you with the Membership code that you require.
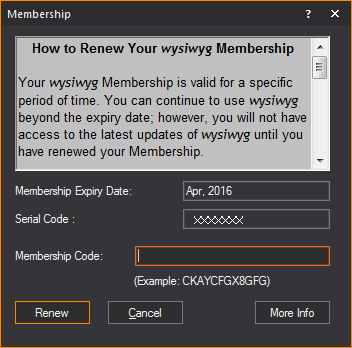
The date when your WYSIWYG Membership expires is displayed in the Membership Expiry Date box.
Note: If you would like to renew your Membership but are unsure of who to contact, click More Info to obtain a list of WYSIWYG dealers.
Details of your Lease are stored within WYSIWYG.
From the Help menu, choose About WYSIWYG.
Result: The date when your Lease expires is displayed in the Lease Expiry Date box.
Your WYSIWYG Lease is valid for one year from the date of purchase. You cannot continue to use WYSIWYG beyond your Lease expiry date; you must either renew your lease, or purchase a Membership to use the program.
Contact CAST Software or your local WYSIWYG dealer to purchase a renewal for your Lease.
Starting 30 days before your lease expires, the Dongle Lease Renewal window appears each time you open WYSIWYG until the Lease Expiry Date is reached, prompting you to renew your lease (or purchase a Membership).
Result: A Lease Renewal Successful message appears and your dongle is leased for another year.
Result: WYSIWYG starts.
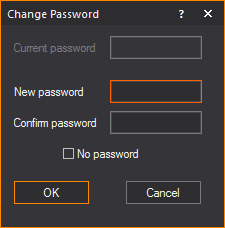
You can set a password in WYSIWYG to password-protect your dongle.
Result: The Change Password dialog box appears.
Result: The next time that you launch WYSIWYG on the same computer, you will be prompted to enter your password. In the Enter password box, type your password. If you do not want to be prompted to enter a password every time you launch WYSIWYG, select the Remember for next time checkbox.
ATTENTION: If you forget the password that you set on the dongle, the only way to reset it is by returning the dongle to the CAST Software office in Toronto, Canada. You will not be able to use WYSIWYG while the dongle is in transit. As such, it is strongly recommended that you make note of the password for safekeeping.
Result: The Change Password dialog box appears.
Note: If you decide that you do not want to password-protect your dongle, select the No password checkbox.
You must run WYSIWYG as Administrator if you want WYSIWYG to save and remember the password next time you launch it.
Result: WYSIWYG Welcome window opens and the Enter password dialog box appears.
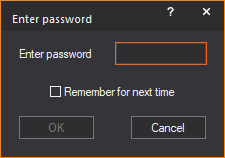
Result: The Enter password dialog box closes, and WYSIWYG is ready to use. WYSIWYG will remember the saved password next time it opens, whether run as Administrator or not.
Notes:
![]() © CAST Group of Companies Inc., 2002-2021
All rights reserved.
© CAST Group of Companies Inc., 2002-2021
All rights reserved.