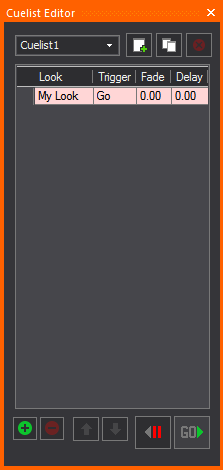
Cuelists enable you to play back stored Looks in any order, without having to resort to the crossfade function described in the previous section.
Result: The Cuelist Editor window appears.

This procedure is useful when you set up one Cuelist with Looks in a certain order, but want to see how the same Looks would "play out" in a different order.
Note: To delete a cue, select it and then click the minus (- ) button in the bottom right corner.
To adjust the position of a cue in the list, click to select it, and then move it up and down using the arrow buttons in the lower left corner.
Once you add a cue, you can assign a Look to it by clicking the drop-down list in the Look column and selecting the appropriate Look.
There are two types of triggers that you can set for each cue in your Cuelists:
To switch between triggers, click to select the appropriate cue, and then click in the Trigger cell. From the drop-down list, you can toggle between Go and Follow.
The fade is the time (in seconds) that it takes to transition between the previous cue and the current cue.
Notes:
To enter the fade time, click to select the appropriate cue, and then click in the Fade cell to type the new fade time.
The delay is the time (in seconds) that it takes for lights to start fading into the current cue. To enter the delay time, click to select the appropriate cue, and then click in the Delay cell to type the new delay time.
To activate a cue, hit the Go button. Note that if the next cue has a 'follow' trigger, it will start as soon as its delay time has passed.
To stop playing a Cuelist, click the <|| button. Click the same button to step back through cues, disregarding fades and delays.
Tips: To "jump into" a cue (i.e., ignoring fade and delay times), double-click in the grey area to the left of the cue. You can use the arrow keys to navigate the Cuelist table.