
In this section
SketchUp is a modeling tool that enables you to create realistic 3D models of many different types of objects and then save the files with an “.skp” extension. You can import these SketchUp files into WYSIWYG in much the same way as you import DWG/DXF files.
Before you import SketchUp files into WYSIWYG, note the following:
When you import SketchUp files into WYSIWYG, the textures associated with these files are saved in a folder on your computer so you can apply them to imported surfaces. By saving them to a folder outside of WYSIWYG, you can use them repeatedly instead of only applying them to the surfaces that are within the current WYSIWYG document.
Upon import, you can choose the location for saving the associated texture files (or accept the default location). If there is already a texture with the same name saved in the location specified, WYSIWYG will prompt you to save the file with a new name.
When importing a SketchUp file into WYSIWYG, you have two options:
If you open a SketchUp file while another show document is currently open, you are prompted to save changes to that document before another show document is opened. Only one show document may be open at a time. When you merge documents, you can add the contents of the SketchUp file to the contents of the current WYSIWYG document.
This procedure creates a new WYSIWYG document out of the SketchUp file, prompting you to save changes to any current document that is open and close it before importing the file.
Before you begin
You must have the SketchUp file saved on your computer to begin this procedure.
Result: The Import Directories window appears.
Note: If a default path is not shown, you must click the browse button and navigate to the desired folder. If there is already a texture with the same name saved in the location specified, WYSIWYG will prompt you to save the file with a new name.
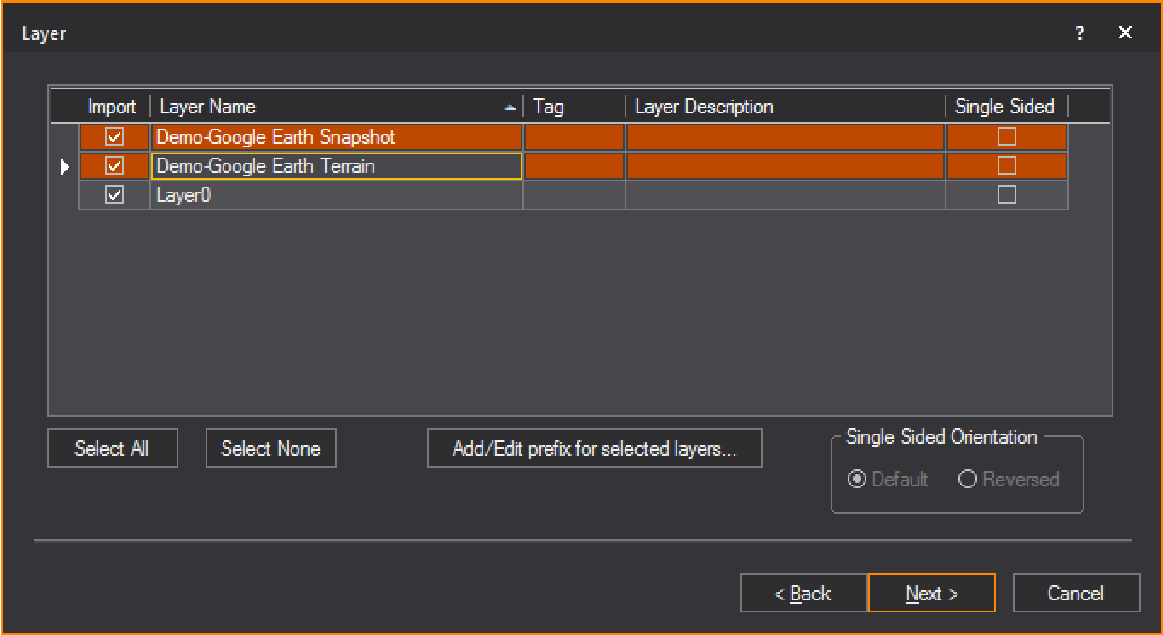
Result: The Layer window appears.

Note: Single-sided layers use less processor time to display in Shaded views and to render in the Render Wizard. However, they only appear properly in each of these views if the faces of the object are drawn facing outward. Unless you know how the SketchUp file was drawn, it is recommended that you leave Single Sided deselected by default when importing the layers so that the object appears correctly. Note that you will not be able to see “through” the walls of an imported double-sided venue when you rotate the image around in the Shaded view (unlike the WYSIWYG venues, which are single sided).
If the imported object does not appear correctly in the Shaded view, you can change its sidedness by using the Properties window. You can change it from single sided to double-sided, or vice versa. You can also flip the object’s sides if the wrong side is currently facing outward. For details, see To change an object’s sidedness.
Result: The Change Layer Prefix dialog box appears.

Result: The selected layers will have the prefix added to the layer’s name.
Note: If a prefix is added to a layer that previously had a prefix assigned, the new prefix will override the old prefix.
Result: The Component window appears.

 indicates that the
block is currently on a layer being imported. This icon
indicates that the
block is currently on a layer being imported. This icon  indicates that the block is on a layer that will
not be imported.
indicates that the block is on a layer that will
not be imported. indicates that
the block is a singular block and does not contain any sub-blocks.
This icon
indicates that
the block is a singular block and does not contain any sub-blocks.
This icon  indicates
that the block is a nested block and contains one or many sub-blocks.
indicates
that the block is a nested block and contains one or many sub-blocks.Note: Exploding is not recommended. Exploding should be your last resort to import files, as it is taxing on performance.

Result: The Fixture Select window appears.

Note: WYSIWYG creates a pipe for every imported fixture since fixtures in WYSIWYG need to hang on a hang structure. If, however, fixtures are on a straight pipe represented by a straight line in the DWG file, WYSIWYG will convert the entire line into a pipe.
Tip: If you select the Remember for future imports checkbox in the Library Browser, WYSIWYG will automatically map the same fixture that appears again in the next SKP file being imported. (You can change the automatic mapping if required.)
Result: The Import Summary window appears.

This procedure merges the SketchUp file into the current WYSIWYG document, placing the object in the location you specify.
At a certain point, the merging procedure is the same as the opening procedure until the end when you choose where to place the object you are merging.
Before you begin
You must have the SketchUp file saved on your computer to begin this procedure.
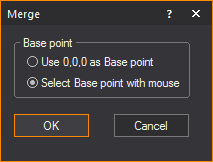
Result: The Merge dialog box appears.
Result: The Merge dialog box changes asking for a Base point.
Result: The Merge Summary window appears.

![]() © CAST Group of Companies Inc., 2002-2023 All rights reserved.
© CAST Group of Companies Inc., 2002-2023 All rights reserved.